• About / Contact
  • Work With Me
  • Food & Drink
    • asian —>
      • chinese
      • indian
      • japanese
      • korean
      • malaysian
      • taiwanese
      • thai
      • vietnamese
    • brunch
    • coffee and tea
    • dessert
    • fusion
    • happy hour
    • italian
    • greek
    • mexican
    • pub
    • seafood
    • steakhouse
    • vegetarian/vegan
    • western
  • Travel
    • Canada ->
      • Kelowna
      • Sunshine Coast
      • Victoria
    • Japan ->
      • Himeji
      • Kamakura
      • Kobe
      • Kyoto
      • Osaka
      • Tokyo
    • Mexico ->
      • Cancun
      • Isla Mujeres
      • Playa Del Carmen
    • USA ->
      • Las Vegas
      • Los Angeles
      • New York City
      • Seattle
    • Europe ->
      • London
  • Beauty
    • beauty events
    • body
    • eyes
    • face
    • costumes
    • hair
    • lips
    • nails
    • skincare

Curiously Carmen

Toulouse Petite Kitchen Lounge (Seattle)

November 6, 2014

I was also down in the States last weekend, and although I was hoping to have some quiet time to relax in my hotel room and blog, it didn’t quite happen. This time around, we decided that we wanted to try different restaurants that Seattle had to offer other than just the restaurant chains we were used to (I’m looking at you, Cheesecake Factory and PF Changs). Yes, they are delicious and reputable restaurants, but I wanted to try places that were only offered in Seattle.

One of the places that we wanted to try on our visit here last month was Toulouse, but we didn’t get the chance to. This time, we made sure that we would check this place out! We were also quite fortunate, as our hotel was a mere 10 minute walk away (if we didn’t get lost, that is.. but in my defense, we didn’t have a physical map or data on our cell phones to find it).

After walking around the Queen Anne neighbourhood for a bit, I knew that we had reached the restaurant when I saw tons of late brunchers waiting outside a dark/lime green-ish building. I braved the crowd and asked for a table of two. We were told that the wait was going to be 35-40 minutes. WHAT?! Since we were set on trying this place and we wanted a seemingly delicious lunch, we sucked it up and walked around Queen Anne a bit before coming back to wait in line.
Toulouse 4

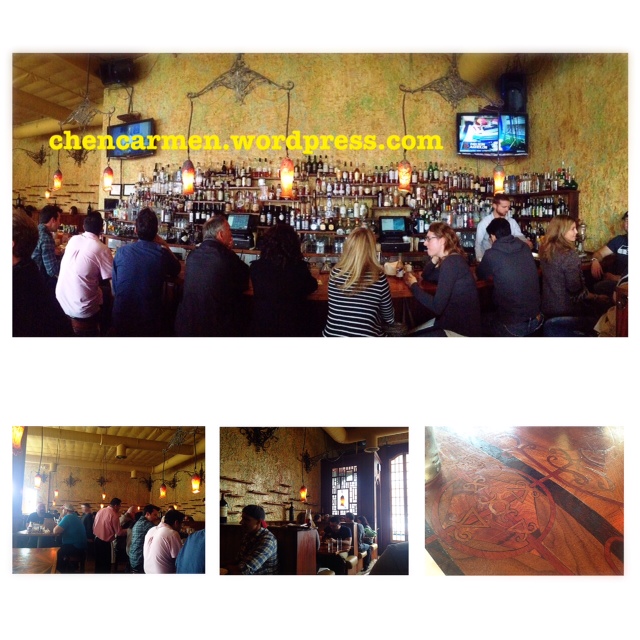
After 35 minutes of waiting, we were seated at a big and high communal table, with 4-6 other brunchers sharing the space with us. The colouring and decor of the wall gave it a very rustic and homey feeling, despite the high ceilings. The liquor cabinet was definitely something to be marveled at though, look at how extensive their collection was!

But it was too early for alcohol and I had already bought a smoothie while waiting in line earlier. The boyfriend was very impressed with the intricate detailing of our tables, known as wood inlay. With his carpentry background, he knew and appreciated the about of labour and effort that went into what (to me, at least) looked like a seemingly basic painted wood design on the table. Needless to say, we were very impressed with the decor and ambiance.
unnamed (5)Another thing to note about Toulouse is that it has won numerous awards and was featured a couple of times on The Food Network (!!!!!). We had absolutely no idea until we were reading the menu. That explains the long waits and high ratings!

Toulouse is rated one of the Top 5 Restaurants in America by Trip Advisor. That is crazy, I had noo idea and it just made our restaurant trip even better. At that point, the boyfriend decided to order two entrees because he couldn’t decide, and it wasn’t often that we ate in one of the “top” restaurants in USA LOL.
Toulouse 2Snake River Farms Kurobota Ham Egg Benedict ($14). I thoroughly enjoyed the smoky flavour of the ham, which was a bit salty as well. The ham was very light and carved really thin. The yolk oozed perfectly onto the ham and english muffin. The hash was seasoned very well and very filling. I’m not a huge hollandaise fanatic, but I do appreciate a delicious hollandaise sauce, this one was no different. It went very well with the smoky and thin texture of the ham. This dish takes second place out of the three entrees.
Toulouse 3

This was the entree that I finally decided on, the Spicy Creole Andouille Hash ($14). First off, my eggs were perfect and ahhhhh-maaazing. It was cooked perfectly in the way that the yolk slowly oozed out, encompassing all of the hash, sausages, and veggies underneath. I was very impressed and happy at how perfect it went. As for the hash, tasso, housemade andouille sausage,  peppers and tomato confit underneath, I enjoyed it as well but found the taste of the red pepper taste to be a bit overpowering. It was my first time trying andouille sausage, a Southern classic. I wouldn’t mind trying it again. There was a lot going on in this dish, but every ingredient complemented each other perfectly, bringing together a very dynamic Creole dish. The fresh green onions on top was the cherry on top of a great dish. 

ToulouseMy favourite plate, hands down, of the day. We found ourselves constantly thinking about this dish even after we had finished it on our stroll back. Cured Pork Cheeks Confit Hash ($15), featured on The Food Network’s “The Best Thing I Ever Ate” TV show. Was it the best thing I ever ate? It certainly came close. The cured pork cheeks was SO GOOD, it was very tender and melted in your mouth, packed with flavour. Mixing in the ooey yolk, hash, arugula, and other vegetables, it was love at first bite.

I love my hearty Southern food because of how savoury and comforting it is. Would I wait 35 minutes again in line? Yes. From the friendly service, intricate decor, and delicious southern food, I am very glad we made the stop here on our trip.

Toulouse Petit Kitchen & Lounge on Urbanspoon


Filed Under: brunch, food & drink, travel Tagged: award winning restaurant, brunch, brunch menu, cajun cooking, comfort food, creole, delicious food, diner review, food blogger, food review, lunch, popular, seattle, southern cuisine, tourism, tourist, travel, travel diary

Urban Fare Deli (Yaletown Location)

October 30, 2014

It was a lovely, sunny afternoon in Vancouver back in July (yes, late post I know.. sorry) and I spent it studying with a friend from school. She lived in Yaletown, so suggested that we meet up there to study. But how do two hungry girls study without proper food and nourishment? We don’t.

So we decided to make a quick stop for lunch at Urban Fare before diving into our pop music history notes. I’ve only ate at Urban Fare one other time, and had a panini which I vaguely remember was pretty tasty. I was going to order another one based on that memory, but as I went up to order it, the calzone caught my eye.
image (8)After much speculation, I decided to get the calzone instead because a) It was cheaper b) Being the curious girl I am, I wanted to try it and c) the sandwiches didn’t sound super delicious that day. Ordering here is a bit different here. You tell the staff what you would like, then they print out a receipt for you.

Then, you go to the cashier and pay, where they initial your receipt and you go back to the deli counter and they hand you your food at the pickup window. Since that visit in July, I’ve been to Urban Fare a handful of times and I have yet to master their seemingly confusing system. Oops.
image (9)I ordered the four cheese pepperoni calzone ($5). It came with sausage, pepperoni, red onions, tomatoes, basil, parsley, monterey jack and Parmesan cheese, and warmed up. I immediately fell in love with the softness of bread, and how doughy it was. The warmness of the dish just emphasized the softness even more. As for the inside, there was a decent amount of sausage and pepperoni. For a dish that has the word “cheese” in the title, it wasn’t that cheesy, which I didn’t really mind. I ended up ordering another one for an afternoon snack later on.
image (10)My friend ordered their breakfast omelette platter, which came with an omelette (duh), sourdough bread, and potatoes. I only tried the sourdough bread, which tasted pretty standard and normal.

-Carmen

Urban Fare on Urbanspoon


Filed Under: brunch, coffee and tea, western Tagged: baking, breakfast, breakfast platter, calzone, cheese, diner review, dough, food blogger, food review, foodie, grocery shopping, healthy alternatives, lunch, lunch options, marketplace, paremesan, pepperoni, restaurant review, urban fare, vegetables

Crackle Creme

October 26, 2014

Crackle Creme is a relatively new cafe in Chinatown that specializes in creme brulee. As the Chinatown area slowly turns and adapts to modernization and hip places for the young, Crackle Creme definitely fits in perfectly. Nestled under a new apartment complex, it is located right on the edge of Chinatown by the Georgia viaduct.

After our semi-disappointing lunch at Pacifico Pizzeria, we decided to try our luck with this cafe. Sangria was back for Thanksgiving weekend, and she is a huge fan of creme brulee so it was the perfect opportunity to try this place out.
Crackle CremeWe went on a cloudy Sunday afternoon, and the streets were quieter than I expected. Because of this, it was a bit harder to find Crackle Creme because I thought that it would be busier there on a weekend.

We finally saw the sign a few stores prior, and the logo of Crackle Creme was a bit hard to read too. You can kind of see it on the glass window there, but not really if you’re far away or if you’re not specifically looking for the place. We knew this was the right place because of the sign out front advertising their goodies, it was definitely not from the window.

Crackle Creme OutsideOut front, they have a small area for customers to enjoy their creme brulee. The table space is pretty small and cramped outside, there is probably only enough room to fit your creme brulee, which is perfectly fine because that’s what they specialize in.

The table is more of a thin wooden slab no more than 15 inches long I think? Unfortunately, it was too cold that day so we didn’t get to enjoy the seats out here and hipster watch teeheehee.
Crackle Creme Inside
Crackle Creme was pretty small, and there was only one person working, we assumed it was the owner. The table space inside was pretty tight too, as with the patio seating. We liked how there was self serve mint water, but two of us had to use the washroom really badly but we were told there was no washrooms =(  So we decided to not drink any more water LOL.

Crackle Cream TorchAfter deciding on a flavour, they then takes a pre-made creme brulee from the fridge, sprinkles some sugar on top, and torch it in front of you. We agreed that the service seemed a bit cold and unwelcoming.

Crackle Cream Green TeaSangria decided on getting the earl grey creme brulee ($5). She has a major sweet tooth, and really enjoyed her creme brulee. The flavours of the earl grey were really pronounced, had a great custard texture to it, and was very sweet.
Crackle Cream Earl GreyFor myself, I decided on getting the matcha creme brulee. I was happy that there was a strong matcha taste to this and that the top layer did in fact, crack as the company name suggests 🙂 However, I am the opposite of my friend and don’t have much of a sweet tooth, and couldn’t end up finishing it as it was waaaayy too sweet for me.  Sangria helped me finish half of it. I’m not sure if I’m biased because I don’t have much of a sweet tooth, but in retrospect, $5 for this seemed a bit overpriced for the size it was.

There are two types of people in this world, those that prefer savoury foods and those that prefer sweet foods. Pick your poison, I much prefer savoury and salty foods over sweets and desserts. Because of this, I didn’t enjoy Crackle Creme that much, and don’t think I would have a craving to come here again, and think that it is definitely over hyped (I’m sorry if you’re reading this and you hate me right now, but that is just my own personal opinion).

I would come back in the future if my friends wanted to, but I don’t think I would order another one by myself. If you love desserts and sweets, this place might be checking out. But if you’re like me and prefer a savoury bacon pepper potato hash (which is exactly what I cooked up this sunny afternoon) over an extremely sweet creme brulee, I wouldn’t recommend trying this place.

Crackle Crème on Urbanspoon


Filed Under: dessert Tagged: baking, creme brulee, dessert, dessert ideas, diner review, earl grey, food lover, food review, foodie, matcha, new restaurant, pastries, pastry, restaurant review, urbanspoon

DIY Easy Pikachu Ears/Headband (No sewing necessary)

October 25, 2014

Pikachu is one of the most lovable and adorable characters from the Japanese based show/media franchise, Pokemon!

Pikachu ears done

For an extreme rookie like me, making these ears were relatively easy. I’m pretty sure a young child is capable of making these ears too hahhaha….. that’s how easy it is 🙂

Pikachu earsMaterials:

  • Yellow and black felt (I used foam because I had some left over from my Minnie costume last year)
  • Hot glue gun, scissors, pencil
  • Random ear clip ons

Pikachu ears bunny

1) Find a random animal ear headband or clip on. The most important part is that it is sturdy, it doesn’t matter what type of animal it is. We will be gluing it over.

I found some bunny ear clip ons for mine!

Pikachu frontThe idea is to basically wrap the original animal ears with yellow felt. It took me three tries to finally get an ear shape that I liked.

Pikachu cut outs

2) After finding a shape that you like, continue to trace and cut four ears out.
Pikachu glue gun

3) Now comes the fun part- gluing! I would recommend gluing the front part of your bunny ears first, or else you risk gluing higher than you actually meant to in the back (which means a lot of the white bunny ear part would show in the front or you would have uneven ears).

Be careful to check where you are gluing before you actually do it, once you add in the hot glue gun, you won’t have much time for changes!

I also marked down which felt edge should match up with the other felt edge, to prevent myself from accidentally flipping one side and making it asymmetrical.
Pikachu ear tips4) The hardest part is now done! That wasn’t too bad right? 🙂 Next up is just the black tips on Pikachu’s ears. For this, I traced the finished yellow ears onto a piece of scrap paper and drafted up some designs on how I wanted the tips to look.

After I drew a black ear tip that I was happy with on the scrap paper, I cut it out and traced it onto the black foam and hot glue gunned them on.

You are also welcome to use black felt, construction paper, black tape, marker, etc etc. I felt that construction paper wouldn’t be as durable, and felt that marker may look a bit ugly or uneven with my art ability. Construction paper and marker tips might get damaged or smudge if it begins to rain and you’re outside…

Pikachu ears doneAnd there you have it! Super easy Pikachu ears for those who don’t want to sew.
pikachu diy ears costume

Happy early Halloween!

Minnie and Mickey Mouse DIY Costume from Halloween 2013!

-Carmen


Filed Under: costumes Tagged: arts and crafts, crafting, diy, diy ears, diy headband, easy diy, halloween, halloween costume diy, halloween costume ideas, no sewing, pikachu, pikachu costume, pikachu ears, pikachu headbands, pintrest, pokemon, pokemon costume, pokemon headband, sew free zone, yellow ears

Minnie and Mickey Mouse Costume DIY

October 21, 2014

Ha! This is probably the most ironic post I’ll ever write because I am probably the worst 20-something year old crafter, drawer, diy-er in the world. I seriously can’t be bothered by craft instructions, nor do I have the patience to sit for hours on end sewing or gluing piece by piece.

As for drawing? I have NO talent in that department whatsoever either. In Grade 9, our class was playing Pictionary and my poor classmate thought I drew a banana. Guess what it was? A SNOWMOBILE. So yes, I am extremely lacking in the arts and crafts department.
unnamed (34)

Which is WHY, as I was saying…that it is ironic that I’m writing this post. The boyfriend and I were Mickey and Minnie Mouse last year, and our costumes were made with things that you probably have lying at home.

I love dressing up for Halloween, but I’m a firm believer that your costume shouldn’t cost you a leg and arm (Halloween pun intended) and if you look around enough, you might just have parts of your costume collecting dust in your closet!

unnamed (33)

Also, please keep in mind that this is not going to be a step by step tutorial, but rather, just briefly showing you what we did, and hopefully inspire you if you’re planning on being Minnie or Mickey Mouse this Halloween. 

Materials used:

  • Foam board, dollar store
  • Cheap cotton gloves, dollar store
  • Old Minnie Mouse head piece, thrift shop
  • Scissors, home
  • Hot glue gun, general store
  • Headband, dollar store
  • Paper (for Mickey mouse only)

We didn’t have a hot glue gun so we had to purchase one (figured it was worth the investment in the future anyways), but that was where the bulk of the money went for this costume.

In total, both headbands and materials cost under $20, considering that one of these in the Disney store cost $20 minimum, not bad!

MickeyFor the Mickey Mouse ears (for the boyfriend), I found a template similar to this, which we then traced onto the black foam. The boyfriend then cut out the foam, positioned the cut outs where it looked appropriate (not too wide apart, but not too close either) and glued it together on the headband.

We got a bit of dried glue on the back of the ears, as you can see :(.  Just to warn you though, the quality up close in real life won’t look that good. But we figured that for the price we paid, it was worth the sacrifice. Plus, the pictures are going to last longer, and the ears turned out pretty decent in photos!

Minnie  I ended up finding an old children’s size Minnie Mouse set from the thrift store for $5. I simply snipped the ears and bows off, and glued it onto my headband. Perhaps you could find one lying around as well, or you can buy/make a red bow and then paint white dots!

Oh yeah, the headband set that we bought came in a set of dark blue and black, which is why mine is dark blue. But once I put it on, my dark hair blends in with it and you can’t tell that it’s blue.

For the gloves, we used the remaining pieces on the foam board and cut out the raindrop shapes and hot glue gunned it.

1403695_256304224516884_1632396849_oAs for the clothes, due to my love of polka dots, I had this dress from H&M lying around from the summer time. I also had a pair of yellow flats which worked perfectly for this costume!

I had to go out and buy a cardigan, but it’s very versatile and doubles up as office appropriate attire.

For the boyfriend, he bought a pair of cheap red pants from the men’s section at Forever 21. He ended up cutting oval pieces from paper, which he then taped onto the pants. I remember that this didn’t turn out so well. From the 5 minute car ride, the tape wasn’t holding out so we had to stop at Shoppers to buy better quality packaging tape.

It would have been better to hot glue gun or sew white fabric on.

unnamed (35)As for the makeup, I kept it relatively simple and placed a lot of emphasis on fake eyelashes and blush. Minnie has super long lashes, so I doubled up my falsies and placed them only on the outer corner of my eyes, to give it more of a cartoon effect.

I wanted to look extra girly and add more of a cartoon effect, so I put on a lot of blush. It’s hard to tell in those pictures though! Of course, I had to draw a button nose with eyeliner as the finishing touch.

1532013_281116645368975_820147862_nAs a bonus, I also got to wear my Halloween costume two months later to Disneyland!

I hope that this post was a bit helpful during the Halloween costume planning season! Half the fun is thinking of, and preparing the costume, am I right?

What are you going to dress up as for Halloween this year? Or, what have you dressed up as in the past?

Thanks for reading!

-Carmen


Filed Under: costumes, face, makeup, personal Tagged: arts and crafts, costume, costume making, costume planning, crafts, disney, Disneyland, diy, dress up, halloween, halloween 2014, halloween costume ideas, halloween diy, mickey mouse costume, mickey mouse diy, minnie mouse costume, minnie mouse diy

  • « Previous Page
  • 1
  • …
  • 148
  • 149
  • 150
  • 151
  • 152
  • …
  • 171
  • Next Page »

Hello!

Hi and welcome to Curiously Carmen! I am Carmen, the girl behind the blog. You can read more about me here!

Recent Posts

  • H&P Noodle House Burnaby
  • Travel: Harry Potter Studio Tour (Watford, UK)
  • Travel: The Resident Soho Hotel, London UK
  • North Noodle House
  • Grand Crystal Seafood Restaurant

Subscribe to Blog via Email

Enter your email address to subscribe to this blog and receive notifications of new posts by email.

Partnerships

View my food journey on Zomato!

Archives

Theme Design By Studio Mommy · Copyright © 2025

Copyright © 2025 · Young Blush Theme on Genesis Framework · WordPress · Log in