• About / Contact
  • Work With Me
  • Food & Drink
    • asian —>
      • chinese
      • indian
      • japanese
      • korean
      • malaysian
      • taiwanese
      • thai
      • vietnamese
    • brunch
    • coffee and tea
    • dessert
    • fusion
    • happy hour
    • italian
    • greek
    • mexican
    • pub
    • seafood
    • steakhouse
    • vegetarian/vegan
    • western
  • Travel
    • Canada ->
      • Kelowna
      • Sunshine Coast
      • Victoria
    • Japan ->
      • Himeji
      • Kamakura
      • Kobe
      • Kyoto
      • Osaka
      • Tokyo
    • Mexico ->
      • Cancun
      • Isla Mujeres
      • Playa Del Carmen
    • USA ->
      • Las Vegas
      • Los Angeles
      • New York City
      • Seattle
    • Europe ->
      • London
  • Beauty
    • beauty events
    • body
    • eyes
    • face
    • costumes
    • hair
    • lips
    • nails
    • skincare

Curiously Carmen

Christmas Holiday Nails!

December 7, 2014

Christmas radio playlist on repeat, planning holiday parties for work,  and some Home Alone movie nights later, it is safe to say that I am getting into the holiday spirit. Last night, when I was sick at home and watching Home Alone 2 (it never gets old), I had the sudden urge to repaint my nails. Then, I realized that I should paint them in the holiday spirit!
Xmas
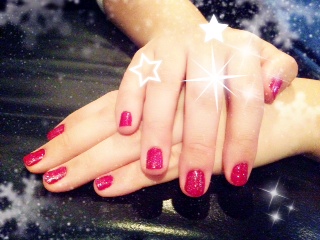
Here is what I ended up with! Pretty simple and classic, but with a holiday twist. Depending on what angle you look at them, it can look a bit more sparkly or not 🙂 Random fact about me, whenever I watch movies, I can’t just sit still and watch the movie… I always have to be doing something, which is why I painted my nails. I’ll also be working overtime tomorrow at my company’s holiday party for our members, so might as well have pretty nails at the registration table and show some holiday spirit.
Xmas nails red
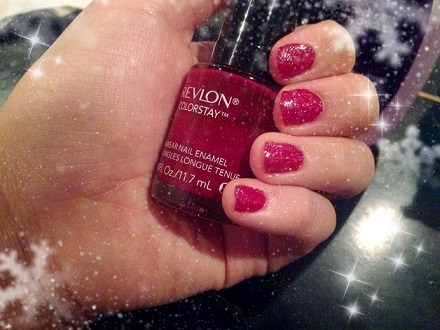
I applied two coats of Revlon’s Colourstay in #130-Velvet Rope. It was my first time using it, I thought it was very pigmented and had a really deep, rich, and red colour. One coat would have been sufficient, but I normally do two coats of colour. I found that the drying time of this polish was a bit longer than I was used to, but I was just watching a movie as I was painting so I didn’t really mind.
Xmas sparkle
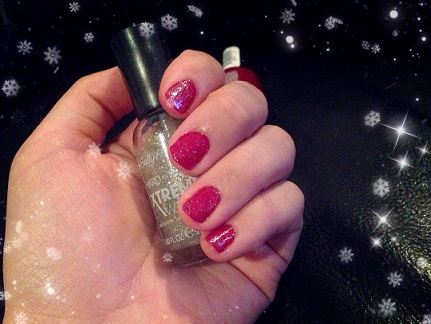
I could have stopped there, but I love glittery and sparkly things and thought that sparkle polish would really add a Christmas twist and holiday magic to it. I used the Sally Hansen Hard As Nails Xtreme Wear in #305-Shine On. I’ve always had great experiences with Sally Hansen polishes, it’s my favourite drug store nail polish as it doesn’t chip easily, easy application, has great pigment/colours, and is very affordable.

Originally, I was debating if I should just paint the tips of my nails or just one nail for accent, but I decided to paint all of them because I love the sparkly look. The sparkles reminded me of tiny snowflakes, or little stars in the night sky. I always used to paint my nails a deep, dark blue or black, and use glitter polish on top to look like the sky so this is just a Christmas version of that. Something about the starry night sky is just so pretty to me and if I could capture a bit of that on my nails, I don’t mind at all.

I’m already thinking of the next holiday themed nails! Maybe I’ll share that too. What are your favourite holiday themed designs to do?

-Carmen


Filed Under: body, makeup, nails Tagged: beauty blogger, beauty review, beauty story, Christmas, christmas nails, christmas season, december, diy, holiday, holiday nails, holiday party, make up, makeup blogger, makeup guru, makeup review, manicure, manicure ideas, motd, nail art, nail design, nail polish, nails, revlon, sally hansen, snow, snowflakes, themed party, winter

DIY Easy Pikachu Ears/Headband (No sewing necessary)

October 25, 2014

Pikachu is one of the most lovable and adorable characters from the Japanese based show/media franchise, Pokemon!

Pikachu ears done

For an extreme rookie like me, making these ears were relatively easy. I’m pretty sure a young child is capable of making these ears too hahhaha….. that’s how easy it is 🙂

Pikachu earsMaterials:

  • Yellow and black felt (I used foam because I had some left over from my Minnie costume last year)
  • Hot glue gun, scissors, pencil
  • Random ear clip ons

Pikachu ears bunny

1) Find a random animal ear headband or clip on. The most important part is that it is sturdy, it doesn’t matter what type of animal it is. We will be gluing it over.

I found some bunny ear clip ons for mine!

Pikachu frontThe idea is to basically wrap the original animal ears with yellow felt. It took me three tries to finally get an ear shape that I liked.

Pikachu cut outs

2) After finding a shape that you like, continue to trace and cut four ears out.
Pikachu glue gun

3) Now comes the fun part- gluing! I would recommend gluing the front part of your bunny ears first, or else you risk gluing higher than you actually meant to in the back (which means a lot of the white bunny ear part would show in the front or you would have uneven ears).

Be careful to check where you are gluing before you actually do it, once you add in the hot glue gun, you won’t have much time for changes!

I also marked down which felt edge should match up with the other felt edge, to prevent myself from accidentally flipping one side and making it asymmetrical.
Pikachu ear tips4) The hardest part is now done! That wasn’t too bad right? 🙂 Next up is just the black tips on Pikachu’s ears. For this, I traced the finished yellow ears onto a piece of scrap paper and drafted up some designs on how I wanted the tips to look.

After I drew a black ear tip that I was happy with on the scrap paper, I cut it out and traced it onto the black foam and hot glue gunned them on.

You are also welcome to use black felt, construction paper, black tape, marker, etc etc. I felt that construction paper wouldn’t be as durable, and felt that marker may look a bit ugly or uneven with my art ability. Construction paper and marker tips might get damaged or smudge if it begins to rain and you’re outside…

Pikachu ears doneAnd there you have it! Super easy Pikachu ears for those who don’t want to sew.
pikachu diy ears costume

Happy early Halloween!

Minnie and Mickey Mouse DIY Costume from Halloween 2013!

-Carmen


Filed Under: costumes Tagged: arts and crafts, crafting, diy, diy ears, diy headband, easy diy, halloween, halloween costume diy, halloween costume ideas, no sewing, pikachu, pikachu costume, pikachu ears, pikachu headbands, pintrest, pokemon, pokemon costume, pokemon headband, sew free zone, yellow ears

Minnie and Mickey Mouse Costume DIY

October 21, 2014

Ha! This is probably the most ironic post I’ll ever write because I am probably the worst 20-something year old crafter, drawer, diy-er in the world. I seriously can’t be bothered by craft instructions, nor do I have the patience to sit for hours on end sewing or gluing piece by piece.

As for drawing? I have NO talent in that department whatsoever either. In Grade 9, our class was playing Pictionary and my poor classmate thought I drew a banana. Guess what it was? A SNOWMOBILE. So yes, I am extremely lacking in the arts and crafts department.
unnamed (34)

Which is WHY, as I was saying…that it is ironic that I’m writing this post. The boyfriend and I were Mickey and Minnie Mouse last year, and our costumes were made with things that you probably have lying at home.

I love dressing up for Halloween, but I’m a firm believer that your costume shouldn’t cost you a leg and arm (Halloween pun intended) and if you look around enough, you might just have parts of your costume collecting dust in your closet!

unnamed (33)

Also, please keep in mind that this is not going to be a step by step tutorial, but rather, just briefly showing you what we did, and hopefully inspire you if you’re planning on being Minnie or Mickey Mouse this Halloween. 

Materials used:

  • Foam board, dollar store
  • Cheap cotton gloves, dollar store
  • Old Minnie Mouse head piece, thrift shop
  • Scissors, home
  • Hot glue gun, general store
  • Headband, dollar store
  • Paper (for Mickey mouse only)

We didn’t have a hot glue gun so we had to purchase one (figured it was worth the investment in the future anyways), but that was where the bulk of the money went for this costume.

In total, both headbands and materials cost under $20, considering that one of these in the Disney store cost $20 minimum, not bad!

MickeyFor the Mickey Mouse ears (for the boyfriend), I found a template similar to this, which we then traced onto the black foam. The boyfriend then cut out the foam, positioned the cut outs where it looked appropriate (not too wide apart, but not too close either) and glued it together on the headband.

We got a bit of dried glue on the back of the ears, as you can see :(.  Just to warn you though, the quality up close in real life won’t look that good. But we figured that for the price we paid, it was worth the sacrifice. Plus, the pictures are going to last longer, and the ears turned out pretty decent in photos!

Minnie  I ended up finding an old children’s size Minnie Mouse set from the thrift store for $5. I simply snipped the ears and bows off, and glued it onto my headband. Perhaps you could find one lying around as well, or you can buy/make a red bow and then paint white dots!

Oh yeah, the headband set that we bought came in a set of dark blue and black, which is why mine is dark blue. But once I put it on, my dark hair blends in with it and you can’t tell that it’s blue.

For the gloves, we used the remaining pieces on the foam board and cut out the raindrop shapes and hot glue gunned it.

1403695_256304224516884_1632396849_oAs for the clothes, due to my love of polka dots, I had this dress from H&M lying around from the summer time. I also had a pair of yellow flats which worked perfectly for this costume!

I had to go out and buy a cardigan, but it’s very versatile and doubles up as office appropriate attire.

For the boyfriend, he bought a pair of cheap red pants from the men’s section at Forever 21. He ended up cutting oval pieces from paper, which he then taped onto the pants. I remember that this didn’t turn out so well. From the 5 minute car ride, the tape wasn’t holding out so we had to stop at Shoppers to buy better quality packaging tape.

It would have been better to hot glue gun or sew white fabric on.

unnamed (35)As for the makeup, I kept it relatively simple and placed a lot of emphasis on fake eyelashes and blush. Minnie has super long lashes, so I doubled up my falsies and placed them only on the outer corner of my eyes, to give it more of a cartoon effect.

I wanted to look extra girly and add more of a cartoon effect, so I put on a lot of blush. It’s hard to tell in those pictures though! Of course, I had to draw a button nose with eyeliner as the finishing touch.

1532013_281116645368975_820147862_nAs a bonus, I also got to wear my Halloween costume two months later to Disneyland!

I hope that this post was a bit helpful during the Halloween costume planning season! Half the fun is thinking of, and preparing the costume, am I right?

What are you going to dress up as for Halloween this year? Or, what have you dressed up as in the past?

Thanks for reading!

-Carmen


Filed Under: costumes, face, makeup, personal Tagged: arts and crafts, costume, costume making, costume planning, crafts, disney, Disneyland, diy, dress up, halloween, halloween 2014, halloween costume ideas, halloween diy, mickey mouse costume, mickey mouse diy, minnie mouse costume, minnie mouse diy

Hello!

Hi and welcome to Curiously Carmen! I am Carmen, the girl behind the blog. You can read more about me here!

Recent Posts

  • H&P Noodle House Burnaby
  • Travel: Harry Potter Studio Tour (Watford, UK)
  • Travel: The Resident Soho Hotel, London UK
  • North Noodle House
  • Grand Crystal Seafood Restaurant

Subscribe to Blog via Email

Enter your email address to subscribe to this blog and receive notifications of new posts by email.

Partnerships

View my food journey on Zomato!

Archives

Theme Design By Studio Mommy · Copyright © 2025

Copyright © 2025 · Young Blush Theme on Genesis Framework · WordPress · Log in