• About / Contact
  • Work With Me
  • Food & Drink
    • asian —>
      • chinese
      • indian
      • japanese
      • korean
      • malaysian
      • taiwanese
      • thai
      • vietnamese
    • brunch
    • coffee and tea
    • dessert
    • fusion
    • happy hour
    • italian
    • greek
    • mexican
    • pub
    • seafood
    • steakhouse
    • vegetarian/vegan
    • western
  • Travel
    • Canada ->
      • Kelowna
      • Sunshine Coast
      • Victoria
    • Japan ->
      • Himeji
      • Kamakura
      • Kobe
      • Kyoto
      • Osaka
      • Tokyo
    • Mexico ->
      • Cancun
      • Isla Mujeres
      • Playa Del Carmen
    • USA ->
      • Las Vegas
      • Los Angeles
      • New York City
      • Seattle
    • Europe ->
      • London
  • Beauty
    • beauty events
    • body
    • eyes
    • face
    • costumes
    • hair
    • lips
    • nails
    • skincare

Curiously Carmen

GUEST POST: Cleopatra Inspired Look

September 5, 2014

Hello everyone! I am happy to have another guest post on my blog, this time featuring a great friend of mine, Rachel. She will be writing about how she created a beautiful Cleopatra inspired makeup look – cat eye lovers, this one is for you! Even if you aren’t a fan of cat eye and/or can’t master the look, read on anyways because Rachel has some great advice AND preview on many makeup brands including Smashbox, Too Faced, L’Oreal, NYX, and Revlon! Thanks for doing a guest post with me, Rach. Hope everyone enjoys, let’s get started!
——————————-
Hi lovely readers of Carmen! I am so excited I get to guest post on here, Carmen’s blog is a must read for me. I trust her as a friend and beauty guru/foodie extraordinarie. I am by no means, a beauty guru/expert status and I also use a lot of drugstore products. So if you are one of those girls sitting at home watching Youtube and then proceeding to sit in (not on, in) the bathroom sink, to get just the right angle for that perfect cat eye–we are one.

rach5
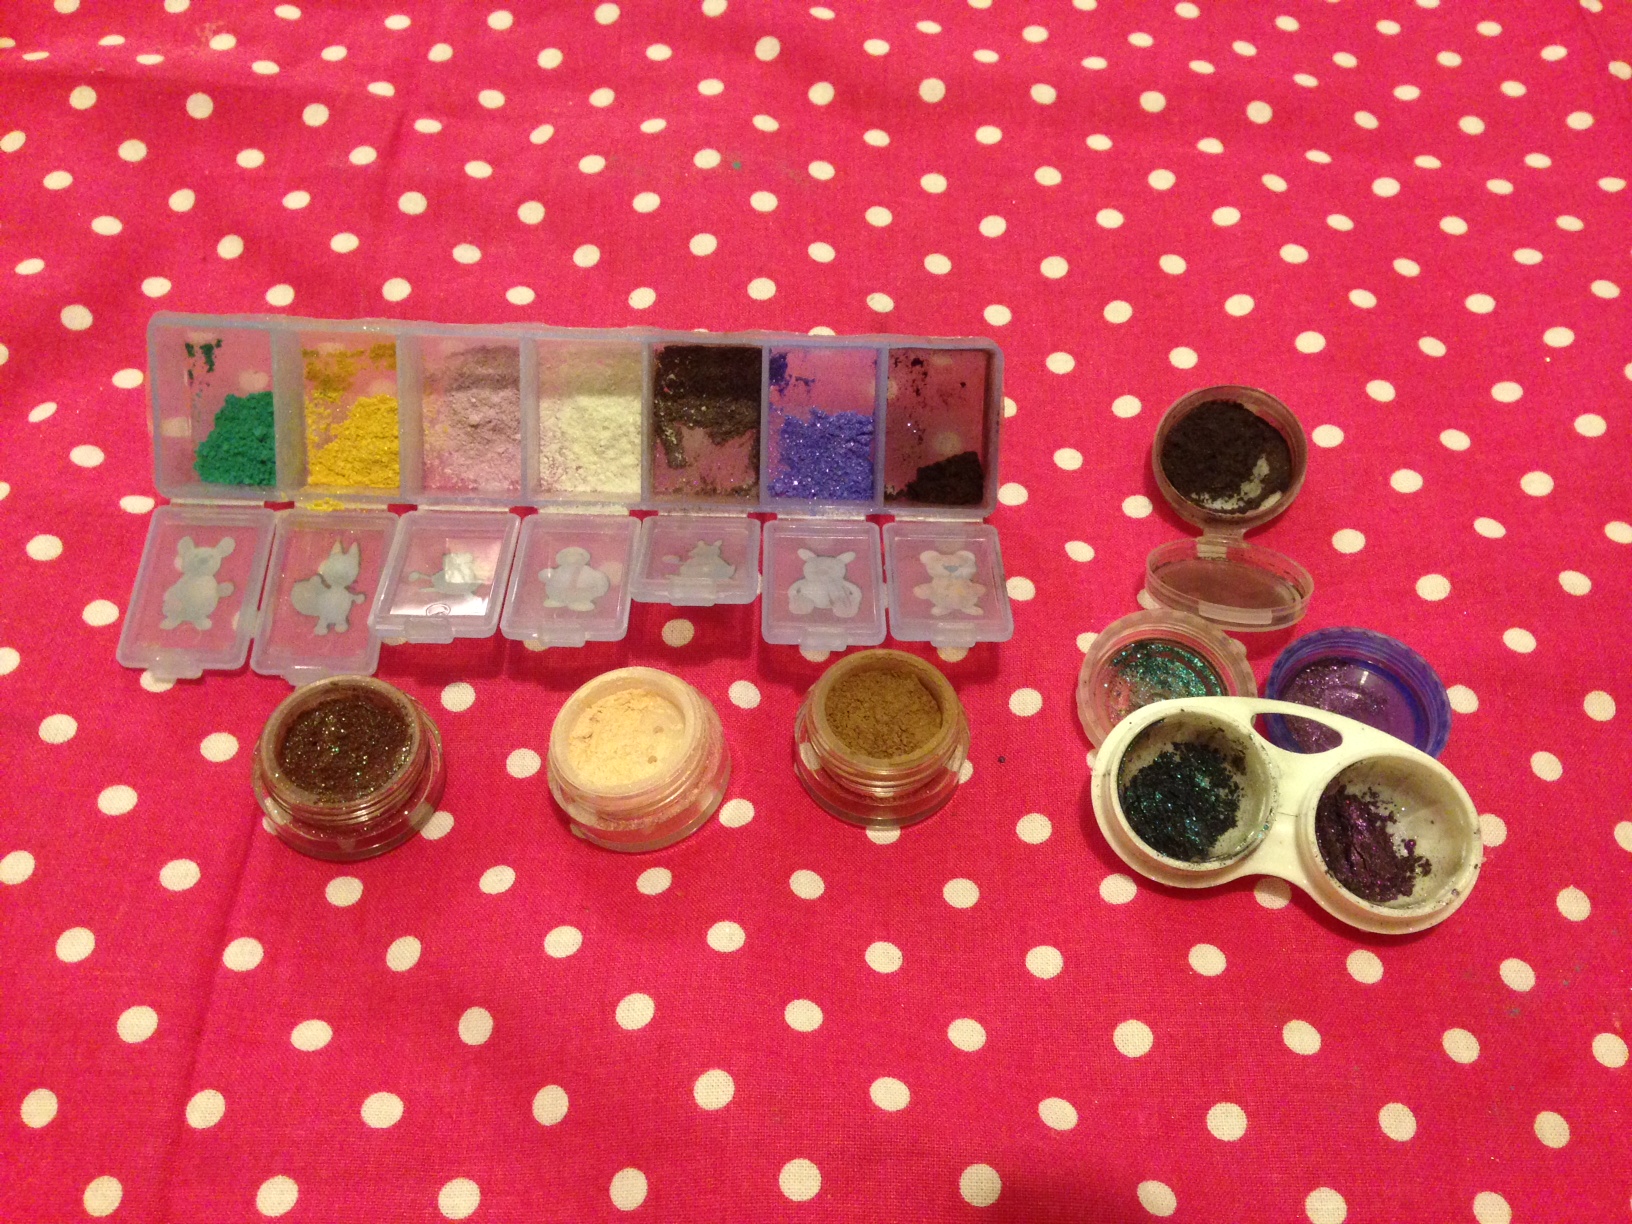
So, I did in fact sit in my sink to do this look. Winged eyeliner is no easy feat, and doing so with liquid liner is even less so– doing winged eyeliner with liquid liner and being Rachel Carrier -post concussion…even harder. This look came about as I was exploring the beautiful world of Miss Cleopoatra herself. Since school stared again, I have come back in touch with my love of literature and enrolled in all a Shakespeare course (be still my heart). One of our assignments involves memorizing and reciting a soliloquy from the piece you are assigned that week. I got Cleopatra and I was beyond excited. Egyptian inspired make up is bold and intricate and so strikingly beautiful. Balancing rich, dark skin tones with piercing, vibrant eyes and lining everything with thick black creates a contrast and a story that represents the person themself. I started by googling images of Cleopatra. The classic thin and precise dark eye brows that match up with thick winged liner and blue eyeshadow and paired with blood red lips was a starting point. I decided to stick to a pretty classic looking Cleo, and I would just tailor it to the products I had and what colours suit me best…aka not blue.

What I used:
rach2
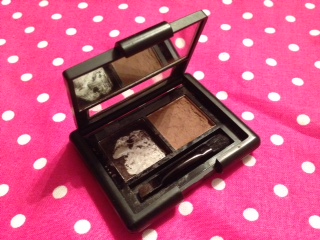
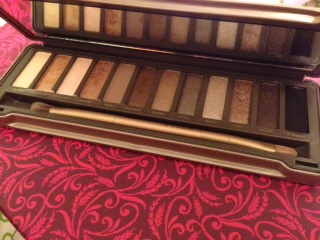
Too Faced- Matte Eye Pallete $50: This is my favourite pallete of all time and a great investment. The brown colour doubles as my eye contour shade AND brows, any double whammy product is good in my books. I tend to stay away from sparkle or shimmer because matte colours are easier to work with on a day to day basis and shimmery colours have a strange effect on my eye.
L’Oreal Colour Riche- New essentials eye quad in 525 $11: When I do use shimmery colours, this is my go to pallete for adding drama and glamour to any look. The pigments are rich and they go on true and do well layered. I suggest stroking your brush through gently and then tapping off the excess and blotting on the pigment before sweeping it on your eye lid for better coverage and less leakage.
L’Oreal Magic Perfecting Base $12.99: I bought this on a whim whilst in London Drugs and shortly after watching a slew of Youtube tutorials. I wanted to have the perfect matte skin that they have, but I was concerned at the price for such a small pot of product. But a little does go a long way, I use it for special occasions when I am wearing foundation. It creates a more even complexion and allows for even coverage.

rach 3Smashbox Full Exposure Mascara $18: This was a Sephora splurge. But, because of my lack of and short lashes, I need a mascara that will support and add body. I am not sure, if it is the one I will use forever, but it has done me proud.
Revlon Bold Laquer Mascara $9 for 2: To be honest, I bought this because it was on sale. I am not sure how I feel about this mascara yet, the brush feels spiny and the mascara itself has a strange texture that is very laquer-esque. I used it as a base before my Smashbox one because I find it does seperate and add length very well.
Revlon Colour Stay Liquid Liner Skinny $7.99: Revlon was having a buy 2 get 1 free sale. I really love this liner though. It has a super, skinny, precision tip and the formula is wearable but not too sticky and it is forgiving.
Maybelline Scandaleyes Waterproof Eyeliner Khol Kajal $2.99: I swear by this stuff. It is so smooth and creamy, it is wearable and I just love it. I use this on a daily basis to tightline my upper lash line and it creates a natural thick lash line.
rach4Revlon Nearly Naked Foundation- 150 Nude $7.99: I like this foundation because it is light and easily blended with a light to medium coverage. It doesn’t crease or become too greasy on my skin either. I tend to stay away from foundation because my skin has a lot of irritations and foundation makes it worse or can look cakey, but this is nice and fluid which makes for a light finish.
Nyx Lipstick- 511 $3.99: This lipstick is a vibrant red with a nice rich formula. It isn’t super creamy nor is it too sticky. It goes on smooth and leaves a nice stain as well. I like to layer it with other colours.
Sephora Lipstick $16: The tube doesn’t say what shade it is, but I love it. This appears different in the tube than on your lips. You should test it first on your skin tone. It is a really dark plum, but it is defintely a rouge. I like the consistency of this lipstick and wear it often in the fall.
rach7For the look itself, I swept the gold colour eye shadow over my lid to the crease and then dabbed the copper colour in the crease and shaded it in to create a dull smoky eye. I added gold to the inner corners of my eye and lined the inner half of the bottom lid with gold as well. I then used the dark shimmery purple to create a more smoky effect on the outer bottom line as well as in the crease. I enhanced the smoky shadow with the black and brown from my Too Faced Pallete, and I used the white as a highlight for my brow bone. Cleopatra has very defined eye make up look and I wanted to soften it slightly for modern day.

I kept my brows well defined and extended them past where I would usually have them. I used a mix of the brown and the black in my Too Faced Pallete. I then tightlined both the upper lash line and the waterline with my black eye liner, making sure to connect in the inner corner for that signature cat eye. Then I used the liquid liner to extend into my winged liner. In most pictures, Cleopatra’s winged liner meets with her brows. That is too extreme for me, so I left about 2 centimeters of space. I finished with more gold on top and two coats of mascara. My trick for stubborn lashes is to heat your eye lash curler under a hair dryer for a few seconds til just warm, then curl and mascara them.
rach6The final touch was the lipstick. I first used a layer of my Babylips chapstick from Maybelline. Then I did a layer of the Sephora lipstick, I blotted, then a layer of the Nyx lipstick then blot and then I pressed some black eye shadow into it as well with my finger and just blended. Of course, a well angled selfie was due after all this work.

And there you have it folks. An easy and modern take on a classic queen. I may not be as striking as Cleopatra may have been, but I hope to have the confidence and wit that she possessed and was known for having. A beauty from within, so to speak. I had a lot of fun doing this, and I am honoured that Carmen asked me to blog it. Thanks for reading, lots of love to y’all.

-Rach


Filed Under: eyes, face, lips, makeup Tagged: beauty guru, beauty products, beauty review, beauty tutorial, cat eye, cleopatra, egypt, egyptian, eyeliner, foundation, l'oreal, lipstick, makeup look, makeup lover, makeup review, mascara, NYX, revlon, smashbox, too faced

Backstreets Makeup Company Review (Handmade, vegan cosmetics)

July 28, 2014

Backstreets Makeup Company is founded by one woman, with a passion for makeup and creating her own vegan makeup products. Yep, you heard that right! April, the owner, actually hand makes each one of her products, where she then posts them on her website to sell at affordable prices.  I have never tried handmade, vegan eyeshadow products so I was quite excited to give these a try!

I wore the colours out once right after I received the products, but unfortunately, did not have time to take any pictures. I finally found the time again to play with these products last week, where my artist friend came up with two looks for me! My opinion will be based on the first time I wore the eyeshadows out, instead of the mini makeup session I had with my friend!
imageApril, the owner, was very nice and friendly. She even sent me a handwritten card when I received this in the mail. The packaging was very thoughtful as well, the makeup products came in two separate layers of recyclable bag. I can not comment on the turnaround time as we found out through our emails that we were actually neighbours! What a small world. But on the website, the TAT is 3-5 days.

Originally, I tried to use the makeup as is in the baggie, but it was very difficult and messy for me. I wasn’t able to get the amount of product I desired, and my table was becoming a powdered mess. I found those small, plastic medicine holders and unused contact lenses cases, and ended up transferring the products in the baggie. The beginning was quite messy as I moved from attempting to dip my brush into the baggie, to moving them into small compartments.
image (2)Yay! After moving them into these pods, they were WAYYY easier to work with! Please excuse the erm… visual appeal factor to the new compartments. But trust me, it really helped! The three pots are the full sized products which you can order. Each pot costs between $4-$5.

One of April’s goals when starting her own makeup creations was to make her products affordable, and I definitely think they are! You get a lot of quality product, and each pot comes with a sifter as well (you can request to not have one if you want). Here are the colours that I received, my first ever swatch!
swatch 2I noticed that some colours weren’t as glittery on my skin as in the eyeshadow packages. Which one is your favourite colour? 🙂

swatch 1As I said in the beginning, my friend wanted to play with makeup and we decided to create two looks with these products, since we had such a wonderful range of colours to work from! I’m glad I did, because I felt that the “love” and “golden pie” colours were too dramatic for me, but they actually turned out pretty neutral when she applied it on my eyes!

The colours are really gorgeous, but I think you would need to apply a lot of each shade to match the colour it looks like in the pot. I also found that there was a lot of fall out, we ended up using an index card under my eye to catch it. It was very powdery as well, which made it very soft to apply on my eyes.

On the day that I wore it out, it lasted all night and the colour did not fade (I used eyeshadow primer too). I was pretty impressed with the staying power of this, and liked how the shades looked on my eyes! I would recommend this product if you are looking for an alternative to your usual, everyday eye products.

Pros:

  • Very soft and powdery texture
  • Vegan and hand blended by April, the owner
  • Not tested on animals
  • Colours are neutral and suitable for everyday wear
  • Does not wear off easily; wore the products on a night out and did not smudge
  • Affordable & cheap
  • Excellent response rate from April

Cons:

  • Fallout when applying
  • Can be hard to apply when the eyeshadows are in the baggie. I talked to April about this and she mentioned that some people actually prefer baggies, so maybe it’s just my own preference?
  • Colour in the pot and on your eye may look different

Check out Backstreets Makeup Company here! You can also follow their Instagram.  I would love to hear your opinions on this product, leave me a comment and let’s chat! 🙂 Thanks for reading!

The products in this post were sent to me free of charge from Backstreets Makeup Company, and I was not paid to write this post. Everything in this post is my personal opinion and was not altered by the request of the company. 

-Carmen


Filed Under: eyes, face, makeup Tagged: beauty blog, beauty blogger, beauty review, cruelty free, eye routine, eyeshadow, makeup, makeup review, makeup tutorial, vegan makeup

June 2014 Favourites!

July 9, 2014

Hello everyone! This is my first time doing a round-up with the Canadian Beauty Blogger network. I am very excited to join this community, everyone is so talented and passionate about beauty products and I hope to bring something to the table as well. I look forward to reading everyone’s posts! Leave me a comment and say hi, I won’t bite 🙂

june favBurt’s Bees lip gloss: I bought this lip gloss due to my search for a lip gloss with natural ingredients. I have been more conscious about what lip products I use, because we directly consume lip product ingredients into our bodies and I would like to minimize the amount of harmful products I consume. I picked this up at London Drugs, and it was around $8. I like how the shade looks on my skin tone, and how non-sticky it is. I haven’t really bought many Burt’s Bees products in the past, but after trying this, I will be looking into more! If you know any lip products that are made with natural ingredients, please let me know!

The Face Shop “Face it”  Oil Cut Pore Balm: I did a separate post on my mini haul from The Face Shop. I use this as a primer in my daily makeup routine, replacing my Benefit Porefessional. I won’t go into too much detail here since I raved about it in a previous post, but I do love this product very much and I’m glad that I found it!

Seahorse crop top: I have never worn crop tops until the past month. I was not comfortable with exposing my navel area, even though my friends have told me that I have a nice belly button which I should take advantage of (?? LOL weird I know). Anyways, on a recent shopping trip, I finally found the perfect summer maxi skirt. I am only 5″2 (5″3 would be pushing it haha), so I either have to cut my maxi skirt to avoid tripping everywhere, or pull it a bit higher. I chose the latter, which finally gave me the opportunity to buy crop tops without feeling super exposed! I absolutely love the seahorse pattern of this crop top, and how loose-fitting and comfortable it is. My maxi skirt and this top will definitely be a Summer staple this year!

London fogs: I am addicted to the Starbuck’s earl grey tea latte, which is the same as a London Fog. The thing that stands out for me with Tazo’s earl grey is the lavender taste. The lavender creates a more rounded and fragrant taste. Last month, I decided to try making my own lattes so that I didn’t have to spend money or waste time going to Starbucks every morning. I bought their vanilla syrup and a milk frother, and haven’t looked back since! The lattes I make at home taste identical to the earl grey tea lattes I buy at Starbucks 🙂 In fact, I am drinking one right now as I type this!

Lush herbalism cleanser: I got a sample of the herbalism cleanser from Lush back in May, and at first, I did not like it because it came in a clay form. You have to break off a bit and wet it with water before cleaning, which was a bit annoying to apply on my skin afterwards. But after two weeks of use (and patience), I noticed that my skin improved and I wasn’t breaking out as much anymore. My skin also became super soft and felt really smooth. I will probably do a separate post on this product because I love it now! I’m glad I gave it a few chances 🙂

Well, that’s it for my June favourites! I hope you enjoyed this post and would love to hear your opinion about these products!

Check out Canadian Beauty Bloggers here!

-Carmen


Filed Under: eyes, face, lips, makeup Tagged: beauty favorites, beauty favourites, beauty guru, beauty routine, crop top, earl grey tea, face wash, lip gloss, makeup, makeup favorites, makeup favourites, makeup routine, soy milk, summer, summer favorites, summer favourites

E.L.F. Studio Eyebrow Kit

July 3, 2014

Since my last beauty post, I have promised a drugstore product because I realize I haven’t done much of those. The elf studio eyebrow kit is my favourite eyebrow tool and brow makeup to use. I love how it is super easy to apply, how long lasting it is, and how natural the colour looks on me. I’ve been using this kit for the past eight months everyday, and just recently ran out.

Unfortunately, I live in Canada where we do not sell elf products in drugstores, so I usually stock up when I visit the US (US Targets or Wal-Marts sell them for cheap!) or ask my friend to kindly order them online for me!
photo 1 (8)

Simple packaging of the product. The packaging is very sturdy, I’ve dropped it a few times on tile floor but it did not shatter. The left side is the pigmented wax, which kind of gives off a gel-like texture. The lighter shade on the right is the powder, which sets the eyebrow colour. For me personally, I never used the right side since it was too light on my skin. I only used the pigmented wax.
photo 2 (8)It comes with a small angle and eyeshadow brush, along with a mirror. For $5, this is a really good deal and you get a lot more than what you pay for. The angle brush helps you to colour in your eyebrows with more precision. I normally just use the angle brush from this kit. I know that some people are a bit nervous to use a brush and stick with eyebrow pencils, but to be honest, the application process is tremendously easy.
photo 3 (6)Yep… as I mentioned earlier, I just recently finished my first kit. Looks a bit gross, eh? Oh well. I am pretty surprised that it lasted me this long since I use this every single day.

Anyways, since I use this eyebrow kit daily, I’ll just attach a few random photos from the past few months when wearing this. I think that the shade is suitable for my skin and like that it’s not too harsh of a colour, what do you think?
image (34)Random picture #1: This picture taken from my Face Shop mini haul post!
photo (5)Another random picture from last month…Yes I know my hair is a mess, it was very windy that day in my city and we were by the water 🙂 Also, say hi to Polka the cat again!
photo (4)Taken in Disneyland back in January 🙂

I hope you enjoyed the post, thanks for reading! Comments make my day, and I would really appreciate your support! 🙂
-Carmen


Filed Under: eyes, face, makeup Tagged: beauty, beauty blogger, beauty review, daily makeup, ELF, eyebrow, eyebrow routine, lifestyle blog, makeup, makeup review, makeup routine

Urban Decay Naked 2 Palette

June 14, 2014

I love my Urban Decay products.  I was introduced to the UD Primer Potion in Grade 9, and have been loving their products ever since, from their 24 hour liquid liner, to the Naked Skin foundation (review here), and finally, their Naked palettes.

So far, UD has launched 3 Naked palettes which have all seen insane reception from the beauty community. Whenever they announce a release, Youtube blows up with beauty gurus reviewing the product. For good reasons too, this is one of my beloved eye palettes! I have Naked 2 and Naked 3, but like the Naked 2 more because of the shades!

photo 3 (3)Simple packaging of the product. The physical palette is pretty sturdy, you can throw this into your bag without damaging the product. I brought the Naked 3 for my trip to Disneyland back in January, and it lasted fine all throughout moving around from my luggage to the hotel room and what not. I’ve noticed that some cheaper eyeshadow will fall out if moved around or dropped, but not the “case” for this.
photo 4 (3)Ahhhh…the beautiful shades. You can tell which shades I love using more than others. When it comes to eye shadow, I only wear champagne or golden tones. I used to wear purple a lot, but bright colours haven’t really been in style anymore and I love how champagne colours make my eyes look brighter and whiter.
Application: The brush that the palette comes with is really good as well. It is called the Good Karma shadow brush and is double ended, with both a shadow and crease brush. The shadow brush is used for general application, while the crease brush is used to add dimension (to your outer or inner corners of your eye, for example).
Long lasting?: I always use my UD Primer Potion with my eye shadow. If I don’t, my eye shadow will crease within an hour and it will fade away. With the primer, my eyeshadow will last at least 6 hours with no touch up, which is good considering I have oily skin. I’ve worn this to work, and even if I sweat or run around cause it’s a busy shift, my eye shadow looks untouched or unsmudged with the primer. For the sake of the review, I did not wear the primer tonight. I noticed that after four hours, the eye shadow was pretty much gone. I would highly recommend using a primer, or have the kit with you to touch up.

Value: Naked 2 at Sephora is $62 Canadian. Naked and Naked 3 are the same price as well. It just depends on which shades you like. Considering the quality and colour of the palette, I would say that it’s a good investment as the palette is very versatile and durable!

Pros:

  • Beautiful range of shades!!! (ranging from neutral to dramatic looks)
  • Can experiment with many different colours to create a look that you love
  • Comes with a their Good Karma shadow and crease brush & mirror
  • Easy to carry on-the-go
  • Comes with 4 samples of their different primers
  • No fall out!! (major pet peeve of mine, urgh)

Cons:

  • It is $62, so it is definitely an investment
  • Lasts longer with primer potion (I suggest the UD Primer Potion, as you can sweat a lot but it’ll still hold up)
  • Would not recommend if you do not like sparkly eye shadows or shades (Naked and Naked 3 have different shades than the 2)

Up next: Maybe the Urban Decay Primer Potion or Naked 3? Which one would you like? Thanks for reading!

-Carmen


Filed Under: eyes, makeup Tagged: beauty, beauty guru, beauty review, bloglovin, dove, eyes, eyeshadow, girly, glam, glamour, gold, LUSH, makeup, makeup review, naked2, naked3, OPI, pintrest, tumblr, urban decay, wordpress, wordpress blog

  • « Previous Page
  • 1
  • …
  • 9
  • 10
  • 11
  • 12
  • Next Page »

Hello!

Hi and welcome to Curiously Carmen! I am Carmen, the girl behind the blog. You can read more about me here!

Recent Posts

  • H&P Noodle House Burnaby
  • Travel: Harry Potter Studio Tour (Watford, UK)
  • Travel: The Resident Soho Hotel, London UK
  • North Noodle House
  • Grand Crystal Seafood Restaurant

Subscribe to Blog via Email

Enter your email address to subscribe to this blog and receive notifications of new posts by email.

Partnerships

View my food journey on Zomato!

Archives

Theme Design By Studio Mommy · Copyright © 2025

Copyright © 2025 · Young Blush Theme on Genesis Framework · WordPress · Log in