• About / Contact
  • Work With Me
  • Food & Drink
    • asian —>
      • chinese
      • indian
      • japanese
      • korean
      • malaysian
      • taiwanese
      • thai
      • vietnamese
    • brunch
    • coffee and tea
    • dessert
    • fusion
    • happy hour
    • italian
    • greek
    • mexican
    • pub
    • seafood
    • steakhouse
    • vegetarian/vegan
    • western
  • Travel
    • Canada ->
      • Kelowna
      • Sunshine Coast
      • Victoria
    • Japan ->
      • Himeji
      • Kamakura
      • Kobe
      • Kyoto
      • Osaka
      • Tokyo
    • Mexico ->
      • Cancun
      • Isla Mujeres
      • Playa Del Carmen
    • USA ->
      • Las Vegas
      • Los Angeles
      • New York City
      • Seattle
    • Europe ->
      • London
  • Beauty
    • beauty events
    • body
    • eyes
    • face
    • costumes
    • hair
    • lips
    • nails
    • skincare

Curiously Carmen

Minnie and Mickey Mouse Costume DIY

October 21, 2014

Ha! This is probably the most ironic post I’ll ever write because I am probably the worst 20-something year old crafter, drawer, diy-er in the world. I seriously can’t be bothered by craft instructions, nor do I have the patience to sit for hours on end sewing or gluing piece by piece.

As for drawing? I have NO talent in that department whatsoever either. In Grade 9, our class was playing Pictionary and my poor classmate thought I drew a banana. Guess what it was? A SNOWMOBILE. So yes, I am extremely lacking in the arts and crafts department.
unnamed (34)

Which is WHY, as I was saying…that it is ironic that I’m writing this post. The boyfriend and I were Mickey and Minnie Mouse last year, and our costumes were made with things that you probably have lying at home.

I love dressing up for Halloween, but I’m a firm believer that your costume shouldn’t cost you a leg and arm (Halloween pun intended) and if you look around enough, you might just have parts of your costume collecting dust in your closet!

unnamed (33)

Also, please keep in mind that this is not going to be a step by step tutorial, but rather, just briefly showing you what we did, and hopefully inspire you if you’re planning on being Minnie or Mickey Mouse this Halloween. 

Materials used:

  • Foam board, dollar store
  • Cheap cotton gloves, dollar store
  • Old Minnie Mouse head piece, thrift shop
  • Scissors, home
  • Hot glue gun, general store
  • Headband, dollar store
  • Paper (for Mickey mouse only)

We didn’t have a hot glue gun so we had to purchase one (figured it was worth the investment in the future anyways), but that was where the bulk of the money went for this costume.

In total, both headbands and materials cost under $20, considering that one of these in the Disney store cost $20 minimum, not bad!

Mickey
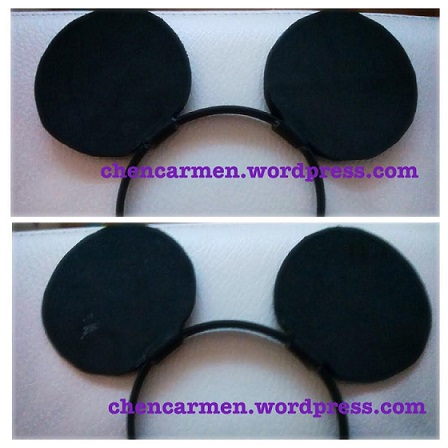
For the Mickey Mouse ears (for the boyfriend), I found a template similar to this, which we then traced onto the black foam. The boyfriend then cut out the foam, positioned the cut outs where it looked appropriate (not too wide apart, but not too close either) and glued it together on the headband.

We got a bit of dried glue on the back of the ears, as you can see :(.  Just to warn you though, the quality up close in real life won’t look that good. But we figured that for the price we paid, it was worth the sacrifice. Plus, the pictures are going to last longer, and the ears turned out pretty decent in photos!

Minnie  
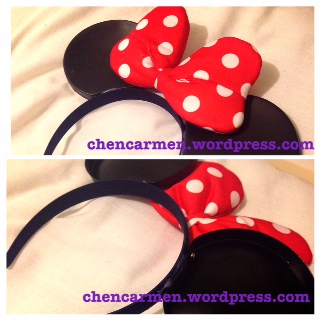
I ended up finding an old children’s size Minnie Mouse set from the thrift store for $5. I simply snipped the ears and bows off, and glued it onto my headband. Perhaps you could find one lying around as well, or you can buy/make a red bow and then paint white dots!

Oh yeah, the headband set that we bought came in a set of dark blue and black, which is why mine is dark blue. But once I put it on, my dark hair blends in with it and you can’t tell that it’s blue.

For the gloves, we used the remaining pieces on the foam board and cut out the raindrop shapes and hot glue gunned it.

1403695_256304224516884_1632396849_oAs for the clothes, due to my love of polka dots, I had this dress from H&M lying around from the summer time. I also had a pair of yellow flats which worked perfectly for this costume!

I had to go out and buy a cardigan, but it’s very versatile and doubles up as office appropriate attire.

For the boyfriend, he bought a pair of cheap red pants from the men’s section at Forever 21. He ended up cutting oval pieces from paper, which he then taped onto the pants. I remember that this didn’t turn out so well. From the 5 minute car ride, the tape wasn’t holding out so we had to stop at Shoppers to buy better quality packaging tape.

It would have been better to hot glue gun or sew white fabric on.

unnamed (35)As for the makeup, I kept it relatively simple and placed a lot of emphasis on fake eyelashes and blush. Minnie has super long lashes, so I doubled up my falsies and placed them only on the outer corner of my eyes, to give it more of a cartoon effect.

I wanted to look extra girly and add more of a cartoon effect, so I put on a lot of blush. It’s hard to tell in those pictures though! Of course, I had to draw a button nose with eyeliner as the finishing touch.

1532013_281116645368975_820147862_nAs a bonus, I also got to wear my Halloween costume two months later to Disneyland!

I hope that this post was a bit helpful during the Halloween costume planning season! Half the fun is thinking of, and preparing the costume, am I right?

What are you going to dress up as for Halloween this year? Or, what have you dressed up as in the past?

Thanks for reading!

-Carmen


Filed Under: costumes, face, makeup, personal Tagged: arts and crafts, costume, costume making, costume planning, crafts, disney, Disneyland, diy, dress up, halloween, halloween 2014, halloween costume ideas, halloween diy, mickey mouse costume, mickey mouse diy, minnie mouse costume, minnie mouse diy

Too Faced Melted Liquified Long Wear Lipstick

October 5, 2014

The beauty world has been abuzz with Too Faced’s Melted Liquified Long Wear Lipstick, which triples as a lipstick, lipgloss, and lipstain all in one. After reading and watching many reviews, I really wanted to find more info and try it out! Plus, I’ve been searching for a fall lipstick colour and I really loved the shades that Too Faced had on this line.

Unfortunately, this lipstick didn’t work out for me but I will give it a second chance. Really disappointing since I was almost in love with it- there was just a tiny problem that was driving me crazy!
unnamed (8)With tax, this tube came to $27 (Canadian) at Sephora when I bought it last week. Probably the most I have paid for a lip product, but I had really high hopes for this one and did not mind the investment! The packaging itself was pretty sturdy, it wasn’t flimsy at all.

I also loved how the packaging of each shade matched the box and tube, there are products out there where you are unable to tell unless you open it up. Since I was looking for a deep and rich shade for fall, I chose melted berry.
unnamed (9)Almost all the reviews I watched and read noted the different application tip, and I really do think it’s worth mentioning! This product features a soft velvet precision tip applicator, which felt very nice on my lip. Since the applicator has a fabric, velvety material on it, the lip product comes out slower as it absorbs through the material first.

There is a small hole in the center of the velvet applicator where the product comes out of, and then spreads out as you apply it on your lip. It reminded me of those mini sponge-y eyeshadow brushes  that are seen at the Sephora makeup testing stations, but thicker.

unnamed (12)

Funny story, when I first applied the product, I completely under estimated how much I would need. Seriously, a little goes a longggg way with this product, which is good considering it cost $27 🙂 I ended up accidentally smudging it all over my chin as I tried to get the excess off, except that it wouldn’t come off and ended up spreading even more!

That was a sign at how long lasting this product is, but it was definitely embarrassing as my boyfriend just stared confusingly at me and said “you have lipstick all over your chin….” Sigh… I finally ended up using makeup remover to get rid of it on my chin.

Anyways, I was in love with the shade at first glance and Too Faced lived up to its words, describing this lip product as “intensely saturated colour”. It was extremely vibrant, noticeable, and will definitely make your lips PoP! It glided really easy too, and the precision tip was very helpful for lining my lips.
I originally wasn’t planning on doing a before and after, but I remembered that I took pictures on my phone on the way to Sephora (I was not the one driving and we were stuck in traffic, also this was the second time I wore my coloured contacts so I wanted to see how they turned out in pictures okay, don’t judge me).

Side note, I did a review on these coloured contacts if you would like to read it! 🙂
Too-Faced-Melted-SwatcheslBUT THIS LIPSTICK IS PERFECT – SHADE, INTENSITY, LONG LASTING. WHAT COULD BE WRONG WITH IT? (Warning- mini angry rant ahead)

I applied this right after I purchased it. When I got back in the car, I noticed that I got some of it on my phone. I thought it was weird since I used makeup remover at Sephora on my chin and hands, but shrugged it off. I’ve read reviews that this has stayed on through drinking and eating, so I decided to eat dinner with this on and test it out.

Then, I noticed that it got on my utensils, which is fair. As I was happily munching on my noodles, I noticed a glop of the product in my noodle soup and on the noodles. It was pretty gross as I’ve never seen product fall off into a glop onto my noodles, and lost a bit of my appetite. I understand if it’s on your utensils and straws, but I’ve never experienced it in my actual food.

In addition, I had also bought some new novels, and was reading one of them as I ate. I noticed that there was lip stain smudge on my page… How did it get there?! My hands were definitely clean and wiped. (You can see it on the top right hand corner, and also on the first line, on “of my”)
unnamed (13)After eating, I went to the washroom, and noticed again that the product was on the toliet lid (Sorry for TMI). ?!?!?!How did it get there too?! I didn’t even touch the lid… At this point, I was getting a tiny bit annoyed as the lipstick had transferred to my phone, noodle soup, my book, and the toliet seat in less than 40 minutes.

THEN, after wiping off the seat, I went to the sink AND THE COLOUR WAS IN THE SINK TOO. I didn’t use the washroom sink prior to this, I’m not even remotely sure how the colour got there! At this point, I gave up and didn’t want this product on my face anymore (Well, not like it was staying on my face to begin with…).  I used a cotton pad to wipe it off, but it would not come off.

Frustrated, I ended up using makeup remover on my lip (well, that’s a first!) and of course, it smudged to my face and took a long time to scrub off. I decided that this product was not worth the hassle. I wouldn’t be as frustrated as I was, but I was 105% certain that my hands were free from any leftover product residue so I’m not sure what kind of lipstick-magic-wizard-sorcery was going on here. Also, why was it so easy to get everywhere but so hard to remove?! =( 
0777

Phew! So, in conclusion, the beautiful shades, precision, and vibrancy of this product is unarguable. So is the long lasting part, as I was having trouble wiping it off without makeup remover. I’m just not sure how it managed to get into my noodle soup in glops, on my novel, the toilet seat, and sink when my hands were 100% wiped and free of any residue. I’m also still technically a student (although I have an internship right now, that money is going straight to my student loans), and can’t justify paying $27 right now for such a confusingly messy product. I guess there’s always that one person who doesn’t have a great experience with it, unfortunately, that was moi 🙁 I’ll probably give this product a second chance before exchanging since everyone loves it.

Am I the only one with this problem? Have you tried this product out as well? 

Thanks for reading! Would love to hear back from you, leave me a comment! 🙂

-Carmen


Filed Under: lips, makeup Tagged: beauty, beauty advice, beauty blog, beauty community, beauty favourites, beauty guru, beauty product, disappointing, face, fotd, lipgloss, lips, lipstain, lipstick, makeup, makeup review, makeup routine, product, regret, sephora, too faced

Amie Natural Skincare Products Review

September 27, 2014

I was approached from UK based Amie skincare line to review some of their skin loving beauty products! I was quite excited as they have just released their products into the Canadian beauty market last month, selling them exclusively at Shoppers Drug Mart.

To give you a brief history behind this brand, Amie was founded by an ex-Estee Lauder executive, who created these products in hopes to help her daughter’s puberty-troubled skin. As a result, Amie products are made for consumers with sensitive skin, whether it is dry, oily, prone to breakouts, whatever. There are also no harsh or irritating ingredients in any of their products, and are made from an average of 95% natural ingredients.  I also have “swatches” of each product at the end of this post so keep on reading!
unnamedMy products arrived in this cute, plastic travel bag. Immediately, I fell in love with the cute and colourful packaging! I was also able to smell the lovely scents of the products after opening the bag. Judging from how good the products smelled when I didn’t even open them, I was quite excited to actually try them out.

I also ended up bringing the plastic bag on a weekend getaway, and kept the bag in the shower the whole time. I loved how it was waterproof and very durable. The smudge on the white part of the bag was from my foundation, which accidentally leaked on the roadtrip – not a packaging fault from the company!
unnamed (1) I had recently finished my favourite matte seaweed moisturizer from The Body Shop, and was looking to either re-purchase it or try a new product. Perfect timing! This is Amie’s matte finish moisturizer ($12 Canadian), which claimed to control oiliness and shine, while softening and hydrating skin. Out of all the Amie products, I liked this one the most as it really did combat the oiliness in my face for over 10 hours and left my skin looking dewy! I didn’t have to dab the oil off my face at work. I suggest this product if you suffer from oily skin like moi.
unnamed (2)This is Amie’s deep cleansing mask ($12 Canadian), which claimed to purify pores, and combat both oiliness and blemishes. I must warn you that this product burned my skin at initial contact, due to the strong peppermint in this. I was actually worried that I was having an allergic reaction to this product, but my face eventually calmed down after 5-7 minutes of applying this. Afterwards, my skin felt really cool and light (again, due to the peppermint probably), and really refreshed. I would recommend this if you want to brighten up your skin, if it looks a bit duller than usual.
unnamed (3)Up next is the radiant dawn exfoliating daily wash ($10 Canadian), which claimed to deep clean pores and exfoliate skin, leaving a clear and radiant complexion behind. I really enjoyed the scent of this product, and it had a gel texture with tiny microbeads. It was very gentle on my skin, and for that reason I didn’t feel that it deep cleaned my pores. I loved the smell of this first thing in the morning, it felt really refreshing and really woke me up. Overall, a decent daily  face wash but probably not suitable for deep cleaning pores.
unnamed (4)The last product I received was the hydrating daily moisturizer ($12 Canadian). Since my skin is more oily, I preferred the matte finish moisturizer that I talked about above more, as this one did leave my skin feeling a bit more oily. I would recommend using this if you have a normal skin type, and just need a simple, everyday moisturizer.
unnamed (5) As promised, here are some “swatches” of the product.  I wanted to give you guys an idea of the texture and consistency of the products. The matte finish moisturizer had the thickest consistency. The deep cleansing mask had more of a paste-y texture to it, and was not as wet or easily spreadable. The exfoliating daily wash was very gel-like, with tiny, non abrasive micro beads in it. This one had an amazing smell 🙂 Lastly, the hydrating daily moisturizer was your standard moisturizing cream.

Pros:

  • Free from parabens, sulphates, mineral oils, animal extracts
  • Catered towards sensitive skin and works well with combating oily skin
  • Vegan and vegetarian friendly
  • Great, light smelling scent

Cons:

  • May be hard to find at Shoppers Drug Mart; I searched some of my local stores online and they did not carry it
  • Products are a lot cheaper in UK than Canada
  • Amie website is a bit confusing to use, some products are missing descriptions

All in all, I really enjoyed all the Amie products and don’t really have anything negative to say about them. They are all definitely affordable, and the packaging is so cute. For the amount of natural ingredients each product has in them, and how gentle it is on skin, Amie products are definitely worth a try!

Check them out at Amie skincare or Shoppers Drug Mart! 

-Carmen

The products in this post were sent to me free of charge from Amie, and I was not paid to write this post. Everything in this post is my personal opinion and was not altered by the request of the company. 


Filed Under: face, makeup, skincare Tagged: amie, beauty blog, beauty blogger, beauty guru, beauty review, canadian beauty, makeup, matte skin, moisturizer, natural, natural skincare, non gmo, oil free skin, organic, paraben free, shoppers drug mart, skin mask, skincare, skincare routine, UK beauty

Estee Lauder Fall/Winter 2014 Media Preview Event (Part 2/2!)

September 16, 2014

As I was mentioning in part 1, I decided to split this post up because it would just be way too long for one post. If you’re just reading this now, these two posts are a review of the Estee Lauder Fall/Winter 2014 Media Preview Event that I went to two weeks ago. I also mentioned in the first post that these two posts will just be a simple overview of the products, as I did not get a chance to try these products well enough to formulate an opinion or review 🙂 However, I was able to bring home many of their already released products as you will see.

photo 3 (1)Out of all the products I was introduced to that day, my favourite would have to be the sculpting foundation brush on the top left, designed exclusively for Estee Lauder. I read about this brush before, but I finally got to see it in real life and hold it! The middle section of the brush is curved, and will effortlessly hug the contours of the face for effortless sculpting and definition. I feel like this brush will definitely be a saviour for beginner contourers like myself. In front of the sculpting brush, is their new perfectionist youth-infusing foundation. It contains their best selling serum, along with advanced ingredients that will create a more “youthful” appearance to the skin. There are microscopic priming beads that instantly fill lines while blurring imperfections- sounds like real life photoshop to me!

Moving on to the top right is Estee Lauder’s new Re-Nutriv Ultra Radiance Foundation. I was drawn to this one because it contains gemstones such as sapphires, rubies, and jade. To add to the elegance, it includes a blend of Gold and South Sea Pearls. These magnificent gemstones and pearls complement each other as they interact with light to create unique, vibrant colours. Unfortunately one small bottle costs $100, but a girl can dream right?

On the bottom left was the Modern Muse perfume, which smelled lovely as well. It is a blend of “sophisticated florals and succulent fruitiness juxtaposed against deep sultry woods”. Wow, I want to be able to write as beautifully as the person who wrote Estee Lauder’s PR book (which I am reading for reference right now cause I forgot what the scent was exactly, haha)
photo 4 (1)At the end of our tour, we were given an option to do the “3 minute mini makeover”, with an Estee Lauder makeup artist. There were four looks that you were able to choose from. As I mentioned in my first post, I am still trying to master the art of contouring so I opted for the contouring option.

photo (2)Here is what I went home with. Thank you so much, Estee Lauder. I was in so much shock, I was definitely not expecting any gifts, let alone this many. I am super ecstatic to try all of these products out and will be doing reviews on them for sure, so keep your eyes peeled.

I am so grateful to be given this opportunity to attend such a great and organized event, thanks to Estee Lauder and the PR team. Everyone working was so kind, welcoming, and talented in what they do. I have a newfound appreciation towards this brand because of this event. Every time I walk by an Estee Lauder booth, I am reminded of the wonderful team of people behind it and I am so grateful and glad that I caught a glimpse of that at the event.

The products in this post were sent to me free of charge from Estee Lauder, and I was not paid to write this post. Everything in this post is my personal opinion and was not altered by the request of the company. 

-Carmen


Filed Under: events, eyes, face, makeup Tagged: anti aging, anti wrinkle, asian beauty, beauty, beauty guru, beauty review, estee lauder, eyeliner, favourite products, fotd, foundation, l'oreal, lipstick, makeup, makeup review, media, media preview, perfume, revlon, sephora, smashbox, too faced

SpookyEyes.com Coloured Contacts Review

September 15, 2014

Disclaimer: These contacts are FDA and ISO approved, and sterile. FDA means that they are approved for use in the States, while ISO is the international health standard institution. The ISO was formed since countries have their different standards of “safe” for many products, so it’s a way to harmonize the requirements for safe contact lenses wear.

I definitely would not be reviewing this product if I did not think it was safe, if the site looked questionable, or had any further doubts about putting these into my eyes whatsoever. Rest assured, although these contacts were sent to me on behalf of the company, they are completely safe to wear compared to other contacts and I would never risk the health of my readers or misinform you guys. With that said, I do know that compared to regular contacts, coloured contacts have a higher chance of drying out your eyes. As with all products, be careful and read the ingredients properly,and use your judgement. 

——-

Helloooo everyone! Today, I will be reviewing a product that I never wear – coloured contacts! My relationship with contacts, both regular prescription and coloured have not been great, to say the least. That is because my eyes tend to dry out really fast, making wearing contacts uncomfortable if I wear them for long hours.

I have tried many different contact lenses, different contact solutions, etc, which have helped on some days, but for the most part, they are not comfortable for me. Fast forward to the present, I only wear the daily disposable contacts probably 3-4 times a month as I find those are the most moisturizing, comfortable, and convenient.

Anyways, I was contacted by UK based sister companies DreamEyes.com / SpookyEyes.com to do a review of their coloured contacts. For simplicity’s sake, I will be referring to them as Spooky Eyes. I haven’t worn coloured contacts for over two years, so I figured I could give them a chance again and if it does work out, I can order a pair of Halloween contacts soon! Here’s how it turned out.
photo 3 (2)I was told to select three coloured contacts that I would like, and one of them would be mailed to me. I was quite excited to see which colour I would end up with! My contacts came roughly three weeks later from the UK. I received the colour green sparkle. 

I was happy to learn that the contacts are manufactured in South Korea, where coloured contacts are extremely popular with the female population. That fact reassured me as I know from prior knowledge that South Korea makes great quality coloured lenses.
dreameyesHere is a screenshot from the website, and what I received. Compared to the picture online, I feel that the green shade in real life appears a bit softer and lighter, which I actually prefer.

There are many different shades of green, brown, blue, and purple on their website. I’ve always wanted to try green contacts with my Asian skin and brown eyes, and I felt that these weren’t too dramatic or harsh.
photo 1 (3)I did not have any trouble putting these inside my eyes, they were like my standard contact lenses. When I first put these on, I was shocked at how my eyes looked. Although these contacts did not specify that they will enlarge the appearance of your eyes, they definitely will!

I was not used to seeing myself with enlarged pupils, let alone green eyes. This picture was taken in natural sunlight. Luckily, the colour matched my skin and eyes pretty well. If it was the green shade as seen on their website, I don’t think it would have looked as soft. I also liked how there is a bit of sparkle to it as well in the sun. How do they look in your opinion?

Since these contacts are only for cosmetic purposes, I still had to wear my glasses. These two pictures were taken outside as well, I try to use natural sunlight when possible. With my glasses on, I don’t think the green is as noticeable at first glance, but if you look longer, you can definitely tell.
photo 1Oops, I forgot to take a picture of my eyes before the contacts so here is a picture from a previous post, taken in the same spot where I took the picture above. Since I have naturally dark eyes, coloured contacts may not always turn out the way it appears, or it may not show up at all!

I’m glad that I didn’t have this problem with these contacts. I ended up wearing these for a bit over five hours, and had no problem at all with them! I actually forgot that I was wearing them until I got in the shower, and my eyes started to sting a bit when water got in.

They were super comfortable to wear, and remind me of a smooth, gel-like material as opposed to thinner, plasticky feeling contacts.
Pros:

  • Very comfortable to wear, smooth gel-like contacts
  • This specific shade was not too harsh which I preferred
  • Colour will show up even on dark coloured eyes
  • Lasts one year and retails for $28 US
  • Made in S. Korea, a country known for great quality and comfortable coloured lenses
  • Great for cosplay or costumes but the softer looking coloured lenses are good for daily wear too
  • Free shipping! 

Cons:

  • Does not currently offer prescription lenses

In conclusion, I am really satisfied with these contacts, as they are really comfortable and I like the colour. They also have a vast assortment of coloured contacts, with all the possibilities imaginable. White out, UV, devil, cat eye, sparkle, anime… they have them all. Here are some I picked out on SpookyEyes:
contacts
Check them out at DreamEyes.com and SpookyEyes.com!

I’m curious, let me know what are your favourite contacts on their site and if you would you consider wearing coloured contacts for fun in the comments!

These contacts were sent to me free of charge from SpookyEyes, and I was not paid to write this post. Everything in this post is my personal opinion and was not altered by the request of the company. 

-Carmen


Filed Under: costumes, eyes, makeup Tagged: beauty blogger, beauty guru, beauty PR, coloured contacts, crazy contacts, dramatic eye, dream eyes, eye colour, eye makeup, halloween, halloween ideas, makeup blogger, makeup PR, spooky eyes, UK

  • « Previous Page
  • 1
  • …
  • 19
  • 20
  • 21
  • 22
  • 23
  • …
  • 25
  • Next Page »

Hello!

Hi and welcome to Curiously Carmen! I am Carmen, the girl behind the blog. You can read more about me here!

Recent Posts

  • H&P Noodle House Burnaby
  • Travel: Harry Potter Studio Tour (Watford, UK)
  • Travel: The Resident Soho Hotel, London UK
  • North Noodle House
  • Grand Crystal Seafood Restaurant

Subscribe to Blog via Email

Enter your email address to subscribe to this blog and receive notifications of new posts by email.

Partnerships

View my food journey on Zomato!

Archives

Theme Design By Studio Mommy · Copyright © 2025

Copyright © 2025 · Young Blush Theme on Genesis Framework · WordPress · Log in