• About / Contact
  • Work With Me
  • Food & Drink
    • asian —>
      • chinese
      • indian
      • japanese
      • korean
      • malaysian
      • taiwanese
      • thai
      • vietnamese
    • brunch
    • coffee and tea
    • dessert
    • fusion
    • happy hour
    • italian
    • greek
    • mexican
    • pub
    • seafood
    • steakhouse
    • vegetarian/vegan
    • western
  • Travel
    • Canada ->
      • Kelowna
      • Sunshine Coast
      • Victoria
    • Japan ->
      • Himeji
      • Kamakura
      • Kobe
      • Kyoto
      • Osaka
      • Tokyo
    • Mexico ->
      • Cancun
      • Isla Mujeres
      • Playa Del Carmen
    • USA ->
      • Las Vegas
      • Los Angeles
      • New York City
      • Seattle
    • Europe ->
      • London
  • Beauty
    • beauty events
    • body
    • eyes
    • face
    • costumes
    • hair
    • lips
    • nails
    • skincare

Curiously Carmen

Stila ‘Perfect Me, Perfect Hue’ Eye & Cheek Palette

May 22, 2016

Stila has launched the Perfect Me, Perfect Hue Eye & Cheek Palette as part of their Summer 2016 collection. This palette just came out this month in addition to two other new products this summer: Stila Stay All Day Foundation (re-launch) and the Colour Correcting palette.

I will also be reviewing the foundation as well, so stay tuned for that!
Stila Perfect Me Perfect Hue Palette Review
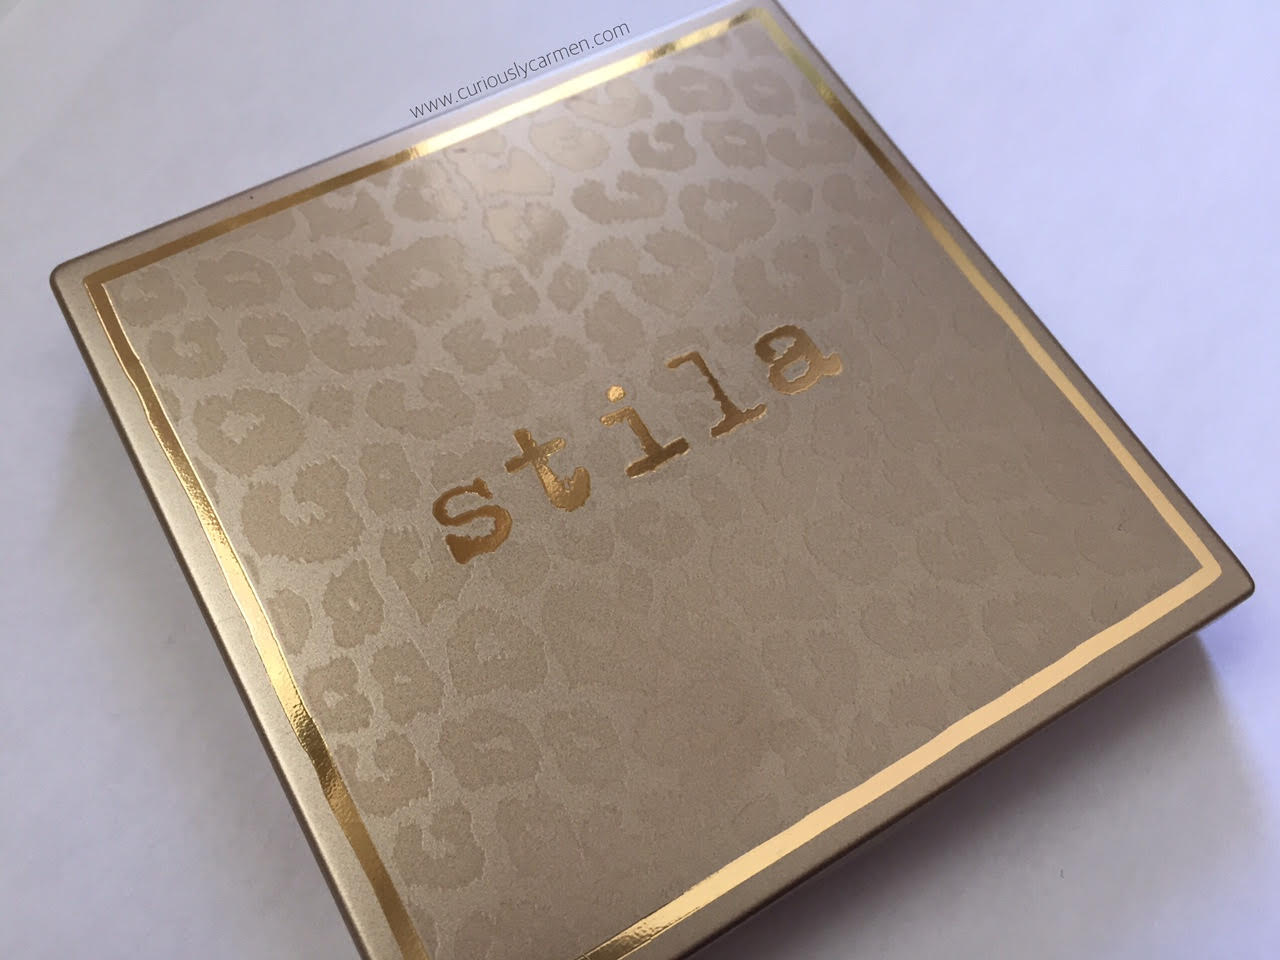
The packaging is consistent with all of Stila’s other products. However, there is the addition of cheetah print! I found the packaging to be good quality, and sturdy enough to put in your purse or luggage without having to worry about it breaking or opening.
Stila Perfect Me Perfect Hue Palette Review
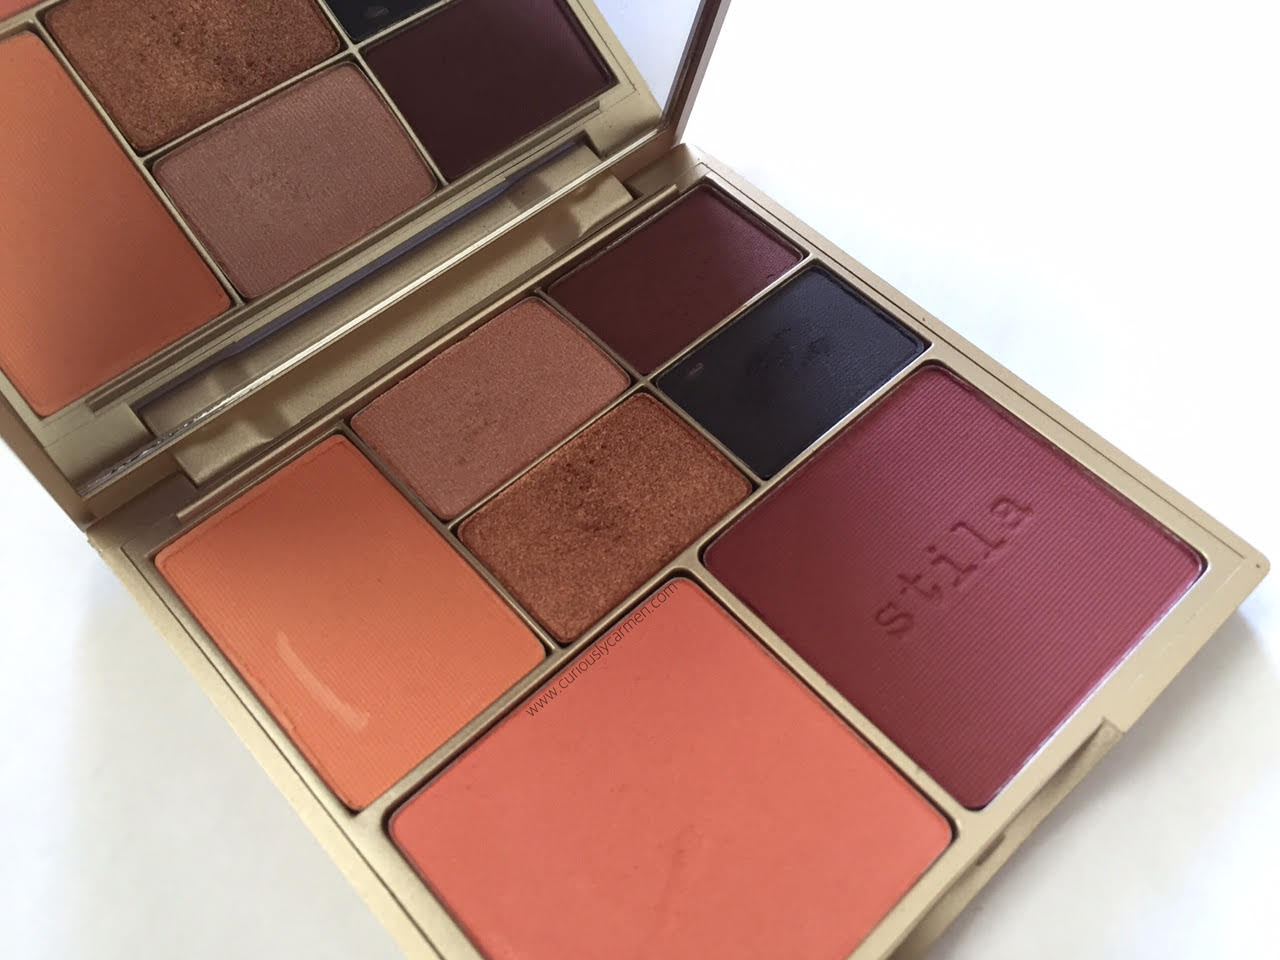
Ta-daaaa! Here are the shades. The bottom two are blushes, while the top shades are for your eyes. There are four versions of this palette, depending on your skin tone: fair/light, light/medium, medium/tan, and tan/dark.

The sample I received was actually for tan/deep skin, which meant it didn’t fit my skin tone completely. However, I will get into that in more detail further along in the review.
Stila Perfect Me Perfect Hue Palette Review
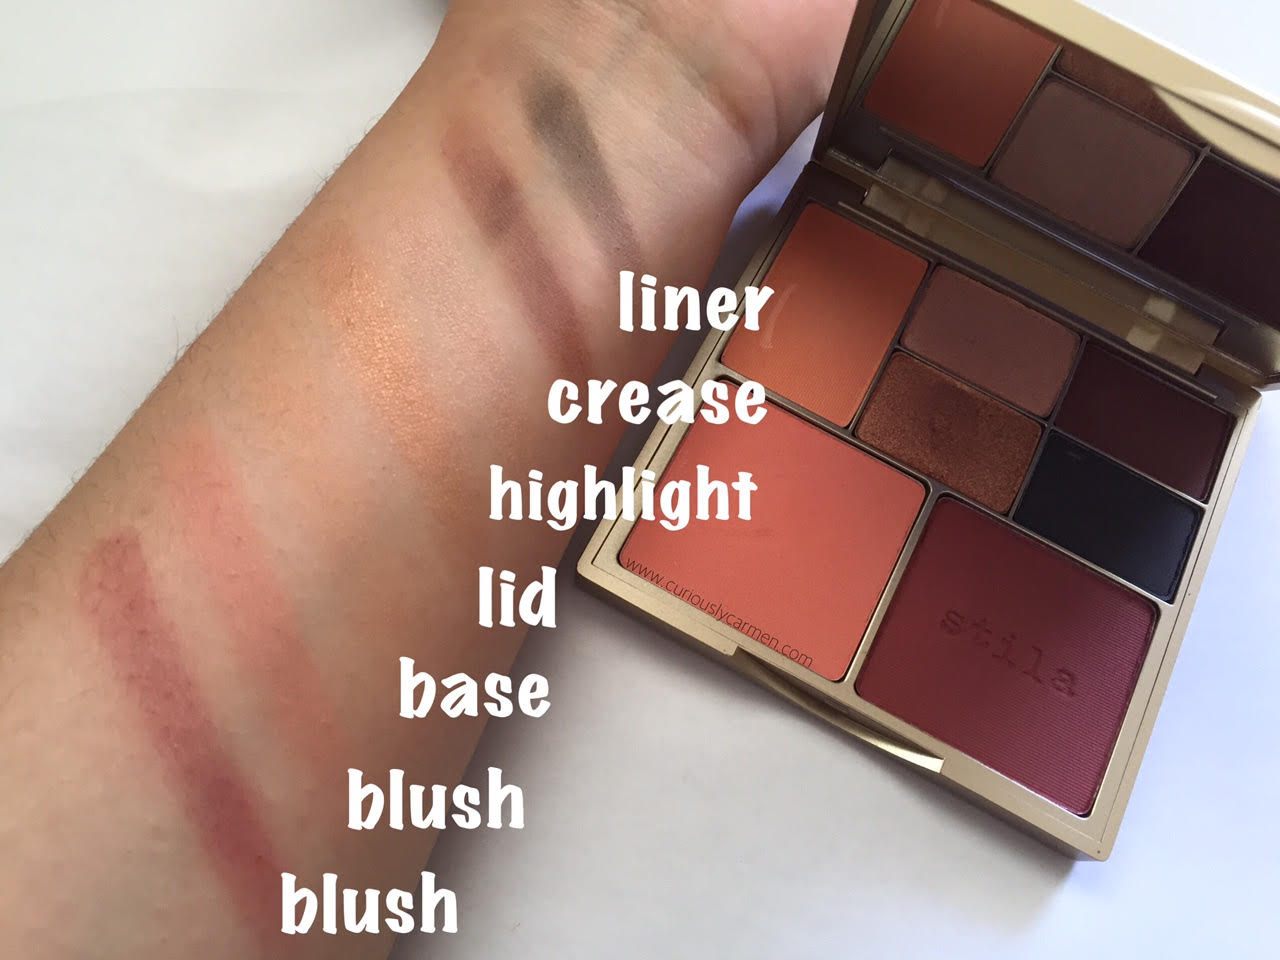
Swatches of the palette. Instead of putting down the shade names, I listed the swatches based on where they are supposed to go on your face. Of course, you don’t have to follow these suggestions if you don’t want to!
Stila Perfect Me Perfect Hue Palette Review
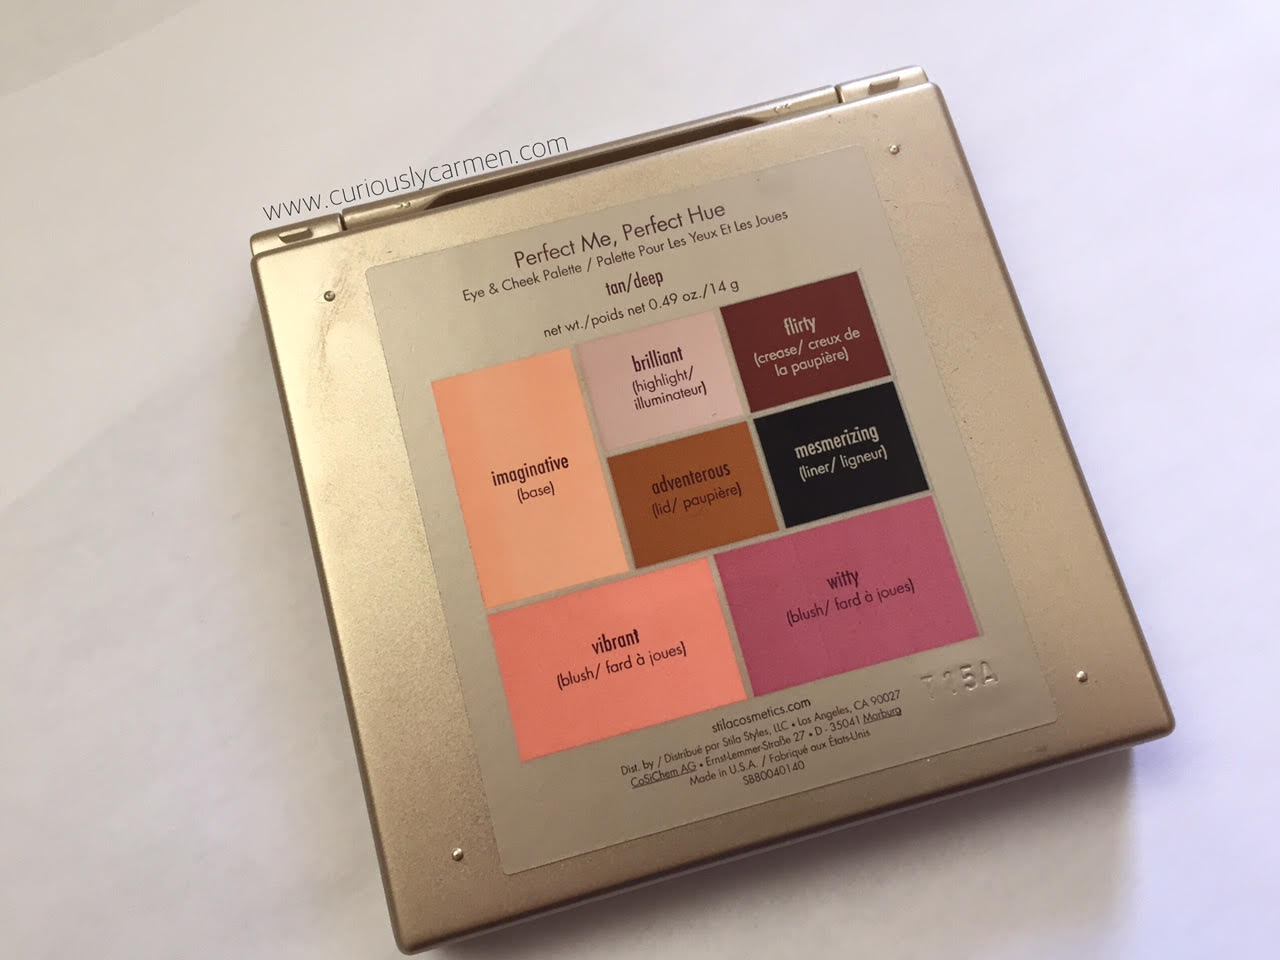
The back of the palette also shows you which shades go where. For someone just starting out with makeup, this would be really helpful!

With the guide, I found it effortless to create a look that complimented each shade perfectly. A lot of the times before I use eyeshadow, I sit there for a good five minutes thinking of which shades to use, and where. I liked how I didn’t have to think about it and was able to create a look that I loved in under five minutes.

Stila Perfect Me Perfect Hue Palette Review
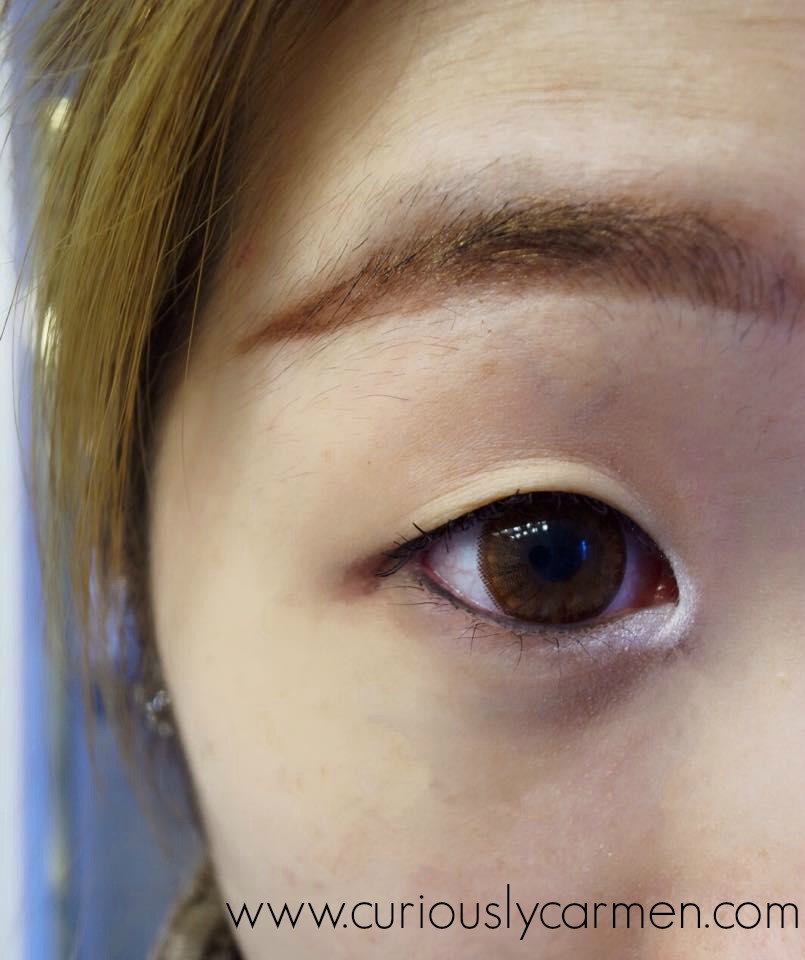
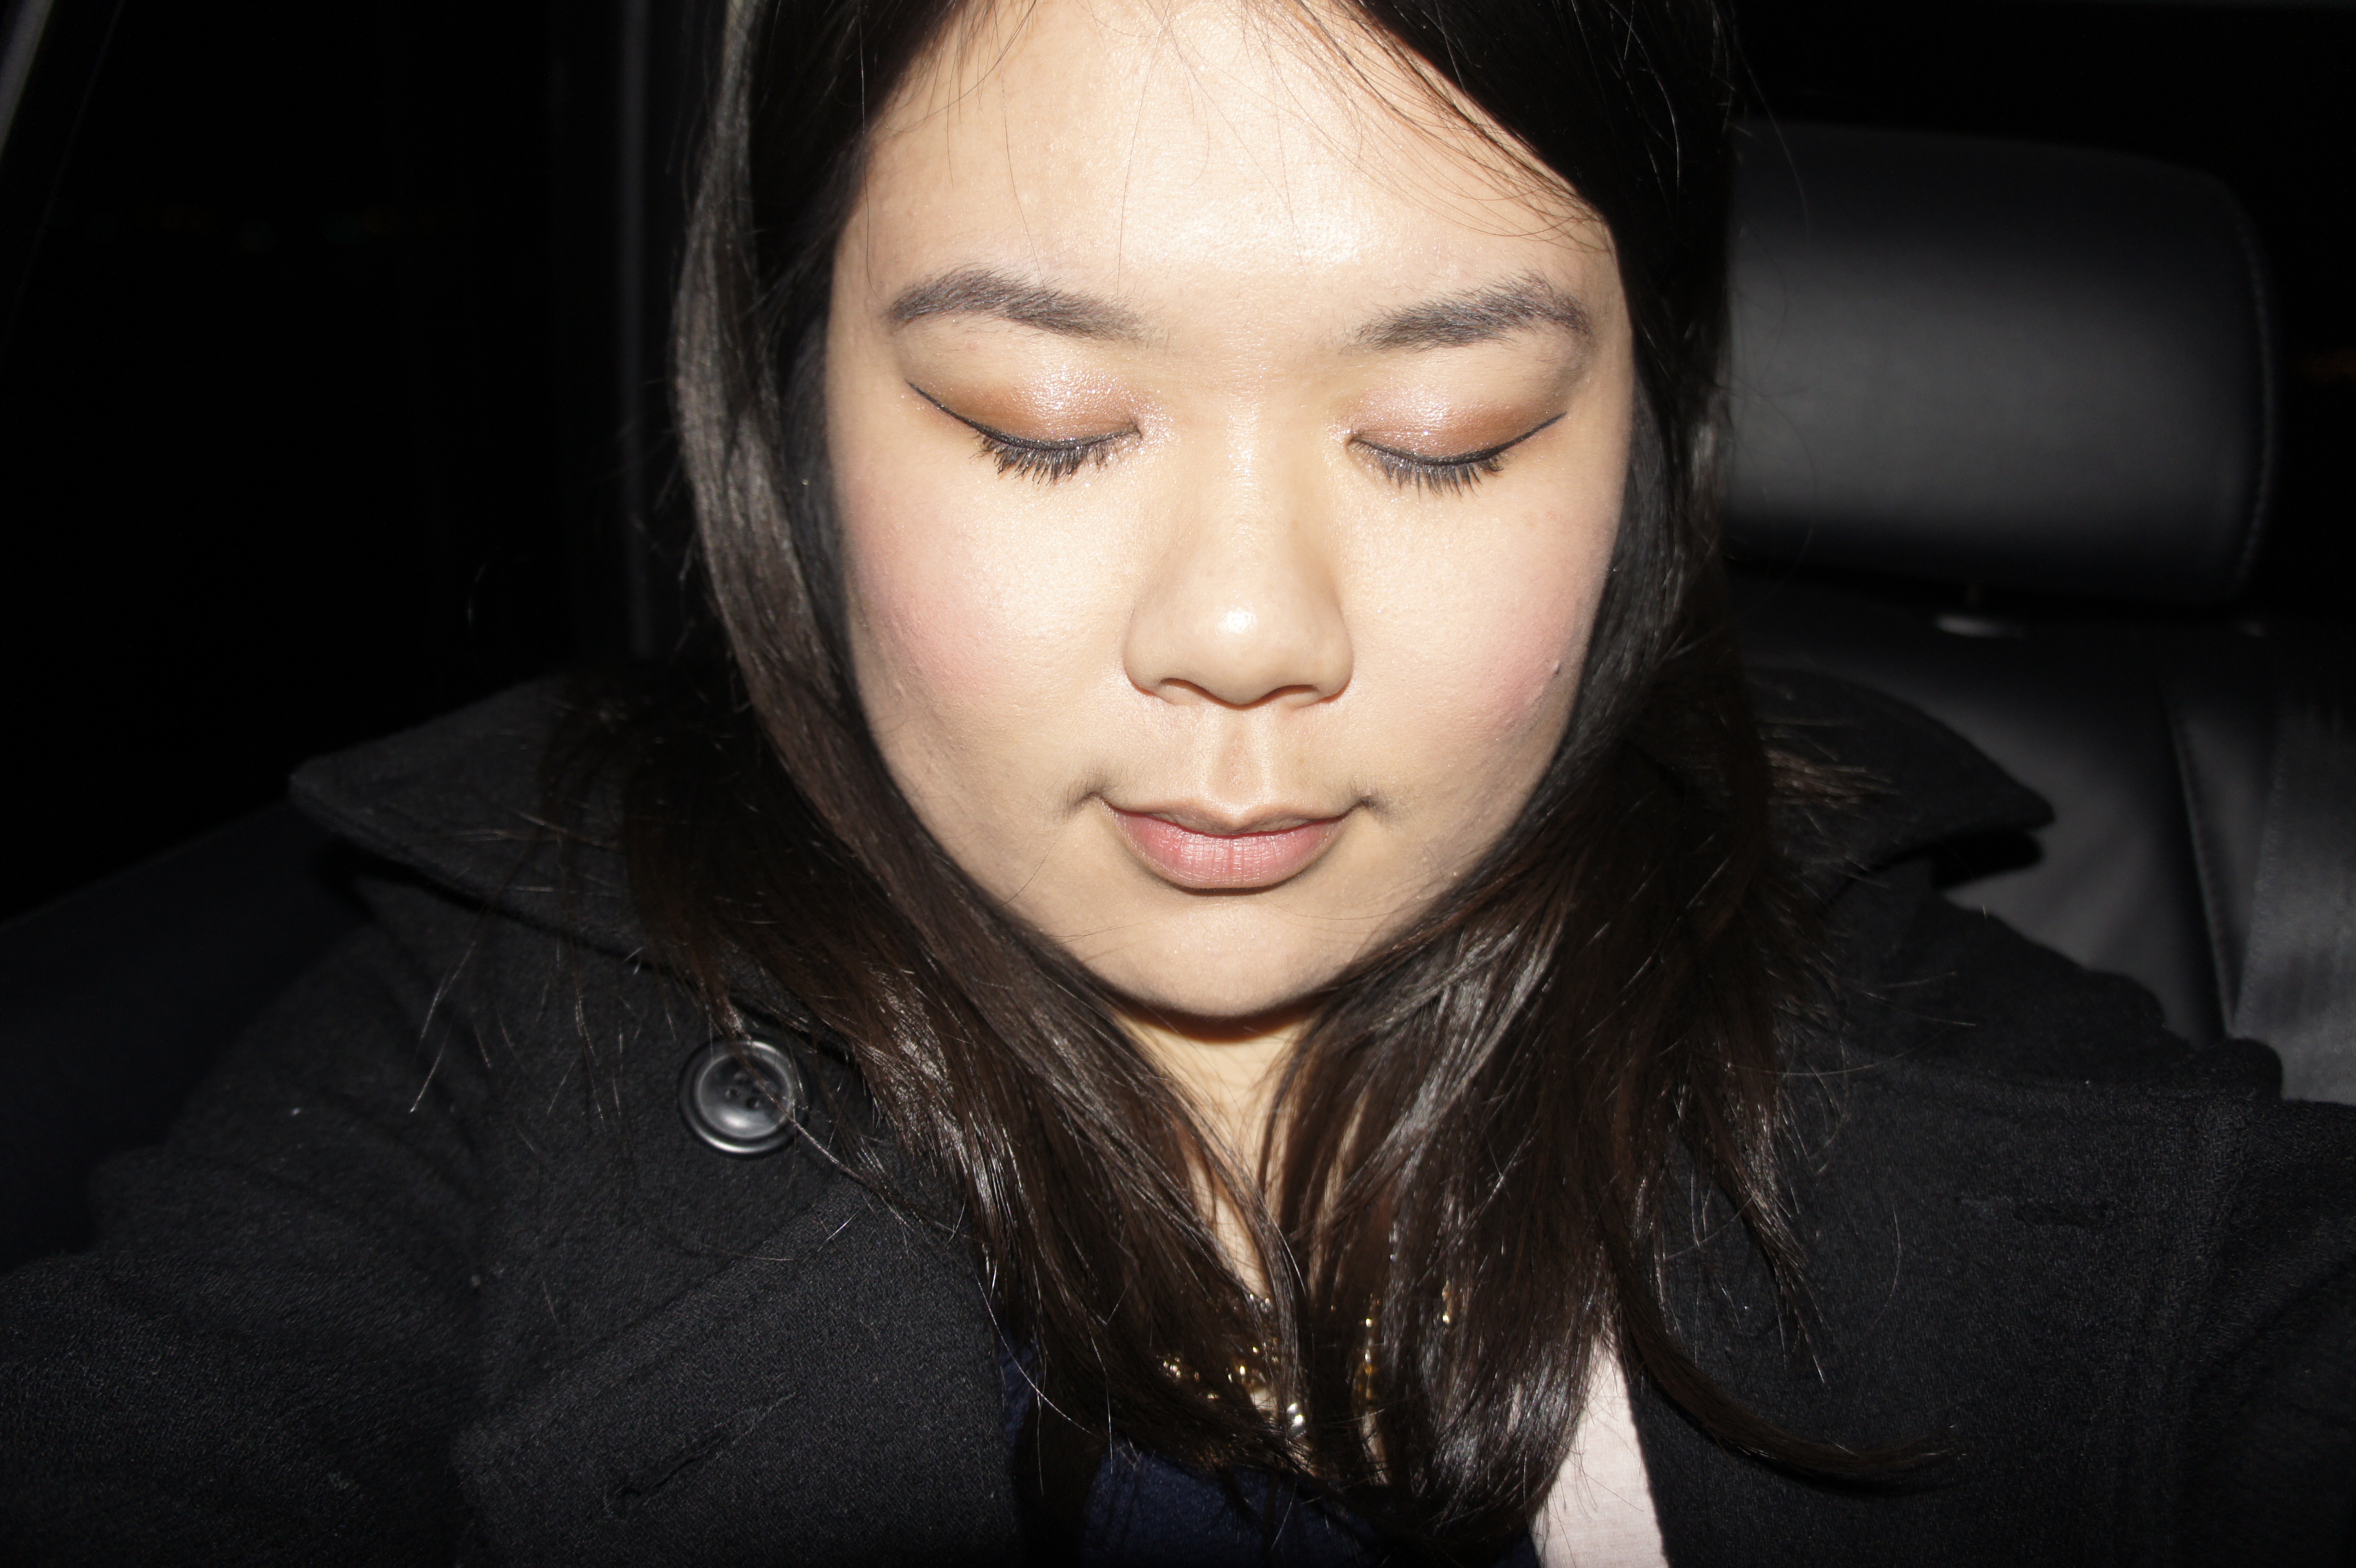
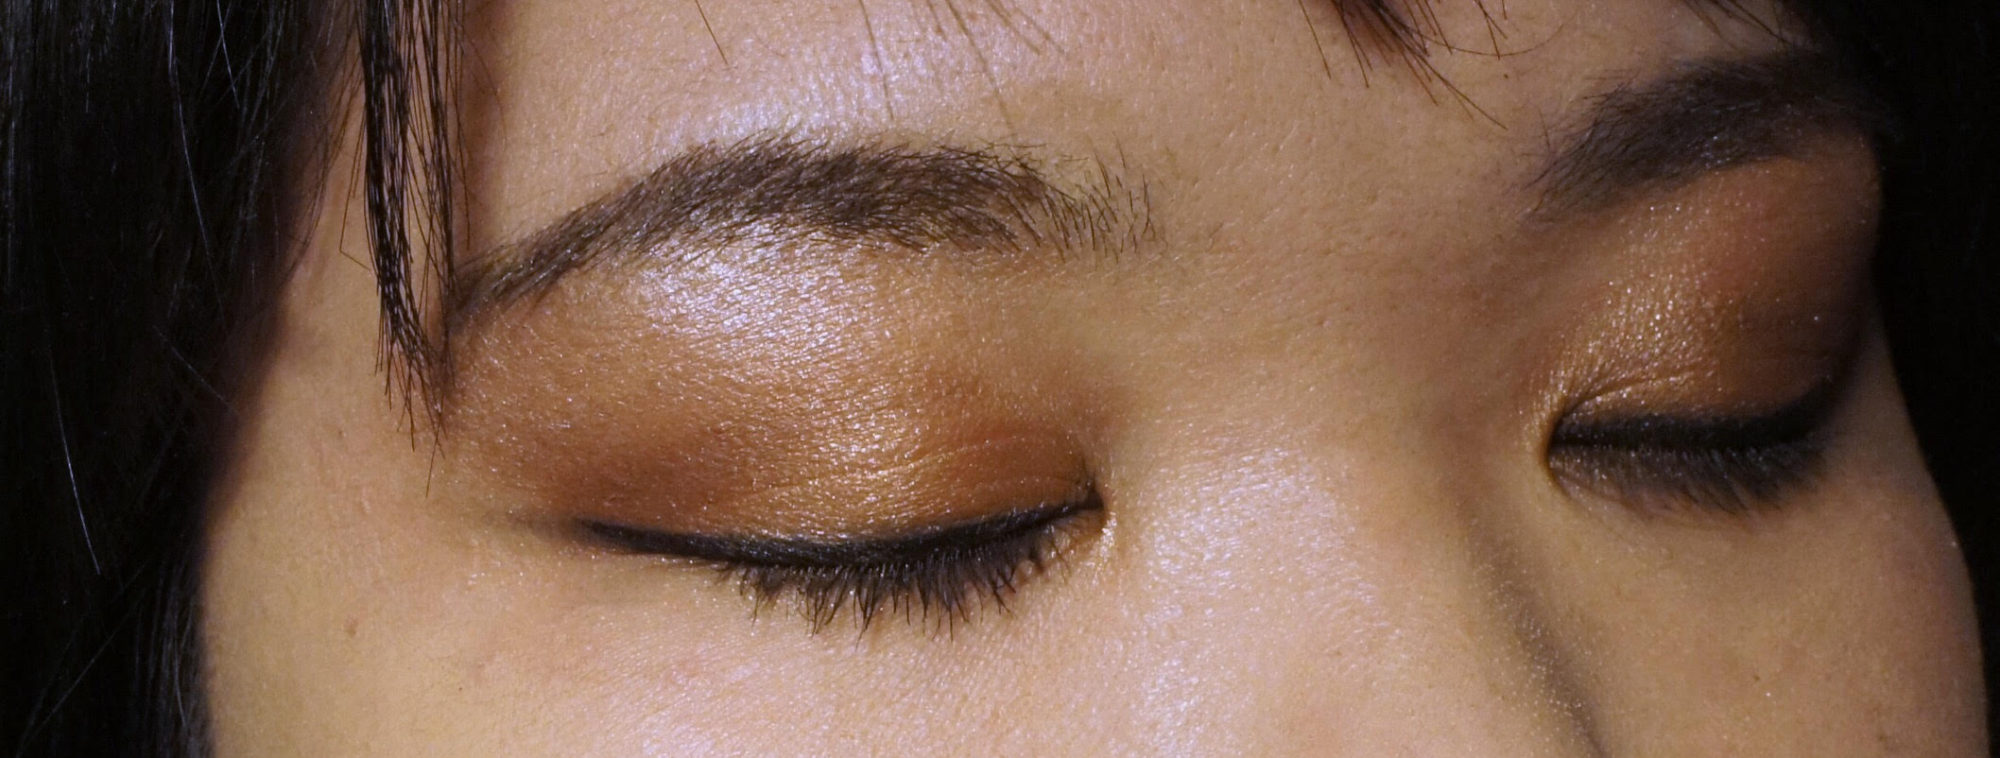
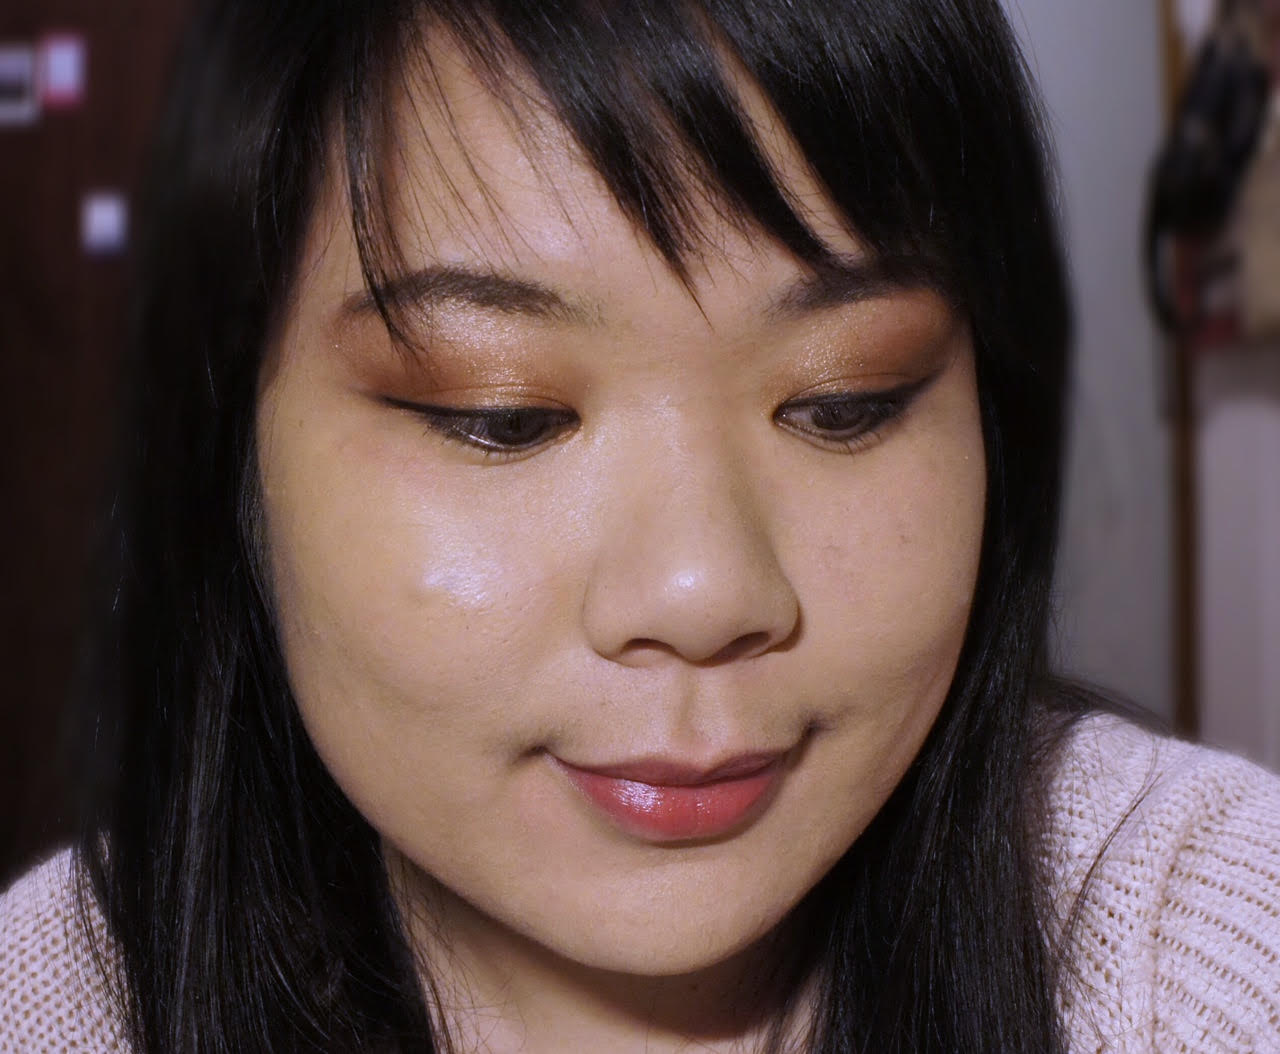
Here is the finished eye makeup look with the palette following the photo provided on the back of the palette! I was really impressed at how pigmented and blendable the product was. I couldn’t believe that it took me under five minutes to finish this look and I love how warm the shade is.

These colours would be perfect for a glamourous summer night out!
Stila Perfect Me Perfect Hue Palette ReviewHere is a close up of the colours! Again, the shadows were really pigmented and super easy to blend.

You may be wondering about the blush? As mentioned in the beginning, the sample I received was tan/deep. The colours in the palette are chosen based on what shades would compliment your skin tone the most.

Because of this, I found the blush did not go well with my medium skin at all. The colour was too vibrant on my skin and made me look like a clown, LOL. Trust me, you don’t want to see how it looked on me. I’m sure that if I tried the blush in the light/medium palette, it would have turned out better.

However, I will say that the blushes are very pigmented as well. One quick dab produced an intense amount of colour!


In conclusion, I really enjoyed playing with this new palette and can see myself wearing the eyeshadow a lot. Even though I have the tan/deep palette, the eye shades still looked pretty good on my eyes. If I had the medium/light palette, I would definitely have used the blush too.

My favourite part of this palette was how quick and easy it was to blend and create the look! It’s nice to know that I can still have a great shadow look even if I am short on time.

You can find this palette at Shopper’s Drug Mart, Murale, and Sephora! This retails for $51 CAD.

yay-nay-or-meh

Yay!

Thanks for reading!

Carmen

Samples provided for review. Opinions are own.


Filed Under: eyes, face, makeup Tagged: beauty, beauty blogger, makeup, makeup review, motd, stila

6 Eye Makeup Looks With One Liquid Eyeliner (Part 2/2)!

April 21, 2015

Hi everyone =)

I am continuing my 6 different eyeliner looks with one liquid liner today! You can read part 1 here. I decided to separate the looks into two posts, because I thought that it would be too long of a single post.

IMG_2433.JPGJust in case you didn’t read part 1, I decided to use my Dolly Wink liquid liner that my friends bought for me in Hong Kong. You can buy them in North America as well, but the prices are a bit higher due to importing, etc. Things are usually cheaper in Asia =)

Dolly Wink is a very popular brand among the Asian beauty industry, it is probably the equivalent to the Kat Von D tattoo liner craze, but Dolly Wink is cheaper. I like my Dolly Wink liner because the pigment is great, lasts long, and the fine tip of the brush makes it very easy to create different looks.

IMG_2272.JPGHere is my eye without any eyeliner! I took this picture to show the differences that eyeliner can do to your eye.

IMG_2273.JPG

The staight line/under eye:  Oops, I forgot to include the “under eye” in the picture as well! This is a combination of two looks.

For this look, I tight lined my eye (more information on how to do that here), and then instead of winging my liner upwards, I followed the downward slope of my eye to create a straight, parellel line that extends further.

One of my favourite beauty gurus talked about it in her videos once so I decided to try it out for myself. The straight line look is very popular in Asian beauty culture, as it gives the appearance of a rounded eye. The straight line also your eyes look rounder and bigger, while the classic winged liner makes your eyes look more sultry.

I also used the Dolly Wink liner as a bottom liner as well! I normally never line my lower lash line, but I decided to try it this time. Lining your bottom lash line is pretty self explanatory. I used lighter strokes so that the colour was not as dark as the top.

My friend, Pauline did a guest post for me and she is a big fan of doing the “straight line” liner look too! Read how she did hers here!

IMG_2274.JPGThe Egyptian cat eye/under eye: 

This is another take on the classic wing, but with more drama and intensity 😉 Start by tight lining your eye, and then extend the wing out. The further you extend, the better! Egyptian makeup was all about a long, beautiful, and thick winged liner. After you have extended, go back and apply your liner over, so that the wing gets thicker.

Tips:
-Go back and ensure that the line you created is even
-Since this look is requires such thick eyeliner, it would look a bit odd if the thick liner suddenly started in the middle of your eye. Line your whole upper eyelid, including the corner =)
-If you’re a beginner, this may take a while to perfect but I believe in you! Practice makes perfect =)

As I was creating this look, I extended my wing so much and it felt so weird! I wasn’t sure if I would like the end result or not, but I really do! I probably would save this look for special occasions, because it’s too intense for me to wear on a daily basis.

I ended this look by lining my lower lash line as well! This time, I lined my lower lash starting from the inner corner, and used a bit more at the outer corner so that it would connect with the top line.

rach5

Speaking of Egyptian cat eye, my other friend Rachel, also wrote a guest post on a Cleopatra inspired makeup look! I love how intense her wing is!

Which one of these would you rather try? Or maybe both?!

Thanks for reading!

-Carmen


Filed Under: eyes, makeup Tagged: asian cosmetics, beauty, beauty guru, cosmetics, dolly wink, eye, eye liner, eye tricks, eyeliner, eyes, makeup, makeup guru, motd, potd

GUEST POST: Sasa.com Makeup & Skincare Haul! 

April 16, 2015

Hi everyone!

Special blog post today- everyone, virtually meet one of my good friends, Pauline (She’s super awesome)! She has agreed to write a guest post for me and I’m excited to share it with you all today. See what type of Asian cosmetics Pauline bought from Sasa.com and how she wore them to the Japanese cherry blossom festival. 

Happy reading everyone!

Carmen 

~~~~~

Hello everybody! I am doing this for my friend, Carmen, as a guest post, and will be the very first time doing this! So, hopefully this goes well… haha!

I recently bought some makeup and face products from this super famous Hong Kong make up store: Sasa. I usually purchase my makeup and face products from here because it’s cheap and my skin seems like to like Asian brands of makeup/skin products. They also often do free shipping once in a while!

The first product I’m going to introduce is an eyeliner by Majorlica Majorca: the cream pencil liner.

Sasa.com Makeup & Skincare HaulI must say, this cream liner is super smooth to line your eyes with, and it’s super creamy. Usually with creamy eyeliner, it smudges easily, but this eyeliner didn’t smudge and actually stayed on my eyes for the whole day! Especially when I tight lined with this eyeliner, I was ready for this to smudge all over my eyes by the end of the day. I was so surprised at how it stayed on so well! 5/5 for this product! =)
Sasa.com Makeup & Skincare HaulThe second product is: Majorlica Majorca’s jeweling pencil. This product is basically a white eyeliner to put on your eye corners to brightening up your eye as well as giving an illusion of having bigger eyes!

Nothing really special about this eyeliner, as I think all white eyeliners can do the same as this one can. 😛

Sasa.com Makeup & Skincare HaulThird product: Majorlica Marjoca’s perfect automatic liner: This product was kind of weird to use at first. So, the first thing you do is twist the bottom of this eyeliner until the ink comes out from the tip. The con of this is that if you twist too much, the ink will splat out and comes into a big mess.

However, after you clean that up, you can just apply that on your eyes just like any other eyeliner would … If you do not want to clean up the mess, this might not be the best product for you, because you will have to twist the bottom every time you want to use this product.

This eyeliner also stayed on really well on my eyes, and was pretty easy to apply as well. So, other than the whole twisting thing, I would rate this 4.5/5 ☺Sasa.com Makeup & Skincare Haul
Hehe … I have combined the three eyeliners mentioned above today, for my makeup look of the day! I went to the cherry blossom Japanese festival with a couple of my friends today, so I thought “hey, why not try out these products if I am going to blog about them anyway!”

I used the cream eyeliner to tight line my upper line as well as my water line. Like I mentioned, it stayed on without smudging the entire day. I then used the perfect liner to line across my eye and winged it out just a tiny bit, facing downwards, to give an illusion of a cute round eye. (…or eyes…)

Finally, I used the white eyeliner to put on my eye corners to brighten up my eyes. ☺

Sasa.com Makeup & Skincare HaulAnd here’s me in a Yukata ☺ .. To protect my friends’ privacy, I have turned them into Rilakkuma and Korilakkuma.

Okay, on with the other products!
Sasa.com Makeup & Skincare HaulFourth product: Shu Uemura Skin purifier (in premium A/I) This product … is godly. Although this is a “cleansing oil”, this will not clog your pores nor will you have a disgusting oily feeling left on your skin after. Honestly, I can say it is like rubbing pearls on your face. There are 4 easy steps to using this purifier:

1.) Pump 4 pumps on your hand (hand and face dry)
2.) Rub the oil all over your face (and eyes if you have eye make up on)
3.) Add water to the oil until it turns into a milky foamy wash
4.) Rinse and wipe your face

Your makeup is literally all gone, and you do not have to go through a second cleanser to clean your face. The oil also leaves you with smooth skin and feeling hydrated.

The best part about this product is : THIS IS FOR SENSITIVE & DRY SKIN!!! Which is a big problem for me, because sadly, I have super sensitive skin … So now that I have found this, I rate it 10/5!
Sasa.com Makeup & Skincare HaulLast product I’m going to talk about is: Laniege Multiberry Yogurt Pack. I have mentioned above that my face is super sensitive … and this mask did not go well with my skin. I gave this mask a try because of all the good things I have heard about it.

It also says that it is for “all skin types” – and let me tell you … It’s not. If you have sensitive skin, do not go for this product. My face reacted one minute after I put this on … The burning sensation and my face was literally all red like a cherry.

I must say, though, this mask smells like as if you are in a strawberry land … So the pro I can only say about this is that it smells super yummy.

That’s it to my guest post! I hope all of you enjoyed reading about these Asian products and maybe try some out on your own as well!

-Pauline

~~~~~

Thanks for guest blogging, Pauline! You look so good in the yukata. I want to wear one too! 

What are some of your favourite Asian cosmetics?

-Carmen


Filed Under: costumes, eyes, face, makeup Tagged: asian, asian beauty, asian cosmetics, beauty, beauty blogger, beauty guru, clear skin, eyeliner, fotd, japanese, lotion, makeup, makeup blogger, makeup guru, moisturizer, motd, perfect skin, sasa, serum, shu uemura, yukata

Maybelline Mineral Powder Review

February 20, 2015

I miss writing drugstore makeup reviews so much! Did you miss reading them? =)

Most cases, I find that drugstore makeup isn’t as good as high end makeup… well obviously, that is a given as you pay what you get right? But there are some times where these cheaply priced products shine! (or not, if you’re choosing matte makeup..ha ha ha… get it…) This next product is one of those, in my opinion. I love using this product as a finishing powder and it has become a regular in my face makeup routine, on days where I actually wear foundation!

unnamed (4)

Announcing… the amazing Maybelline Mineral Power foundation! This has been around for quite a few years now, and you can probably find this at almost every drugstore. I know that I always see this product every time I’m at Target, Shoppers, London Drugs, or Wal-Mart.

Funny thing was that when I first bought this in high school, I really hated it and threw it out. Back then, the product had just been released and came with a free makeup brush. Except that makeup brush was absolutely terrible. Looking back, I realize how important a good makeup brush is because that one made your foundation go on uneven, looked cakey, and was very stiff so it felt a bit unpleasant putting it on.

Anyways, I re-discovered this product after my friend gave me hers. She had bought it and realized that it was the wrong shade, and couldn’t return it. I have the shade 3 – light.

mineral-power-powder-foundation_classic-ivory_pack-shot-crop
Picture from Maybelline.ca

Oh, nevermind, I think it still comes with the brush after checking Maybelline’s website. Has anyone else used this brush? I’m curious to see if it’s really that much of a crappy brush or if I just got a bad batch.

unnamed (3)

You can use this just by itself for a light coverage, but I prefer medium – heavy coverage so I use this as a finishing powder. I use The Face Shop’s pore balm which smooths the look of my skin, but this is really the cherry on top to a flawless and poreless face. The two combined along with my Urban Decay Naked foundation will never disappoint me.

One con that I should mention about this product is that it can get really messy when you’re applying it. It also doesn’t help that I used to carry this around in my luggage or make up bag, and it doesn’t contain a “stopper” so the foundation will spill out through the holes when it’s being moved. By the time you open it, a lot of the foundation has already fallen out and it can get messy.

Now, I try to just leave this at home or I know I’ll be faced with a messy counter the next time I use it.

unnamed

Here is the back, which includes the information and further description if you’re interested! I’m not too sure how much this costs since my friend gave it to me and I can’t remember when I first bought it. I would say probably around $8-$10? Leave me a comment if you know and I’ll update this =)

SONY DSC

This is the most recent picture I have wearing this foundation! I’m wearing The Face Shop pore balm, Urban Decay Naked foundation, and this to finish off as well as a Lancome blush.

If you have the same skin type as me (oily/combination) then I recommend trying this. I can’t say how it will work for other skin types! Keep an eye out for more drugstore makeup posts =)

Have you tried this product? What are your favourite drugstore foundations?

-Carmen


Filed Under: face, makeup Tagged: beautiful, beauty, beauty blogger, clear skin, covergirl, drugstore, eotd, fotd, foundation, makeup, makeup blogger, maybelline, mineral, motd, natural, powder, pretty, review, revlon, rimmel

Valentines Day Makeup 2015

February 19, 2015

Hi everyone,

I apologize for the late post, I have been quite busy outside my blog. I’m really looking forward to having a night to myself where I can peacefully blog without having a million other things to do!

unnamed (1)
Drove to this beautiful viewpoint after Valentines dinner =)

What did you all do for Valentines Day? I hope you all enjoyed it as much as I did. I spent the day with the boyfriend, we had a good day enjoying our city =) As the weather gets warmer and better, I always get amazed at how lovely and beautiful Vancouver is. It happens every single year and I’ve lived here my whole life, and wouldn’t have it any other way. There’s so much to see, explore, and eat in this beautiful city!

Anyways, since this is my makeup blog, I guess I should stop talking about Vancouver and move on to what you’re all here to read =)

unnamed

Here is all the makeup I used that day. Usually, I only wear eyeliner and fill in my eyebrows. I like to let my skin breathe!

unnamed (1)

For my eyes, I wanted something a bit sparkly since I don’t normally wear sparkly eyes. I used my Urban Decay eyeshadow pot in Space Cowboy and Naked 3 palette. Space Cowboy came with my 2014 Sephora Glitz and Glam party bag, and indeed it is a great product to use on a night out!

I created a thicker, winged eyeliner look as well, but I filled in my eyebrows the usual way: Anastasia Brow Gel & the ELF eyebrow set!

Also, I wore contacts! I haven’t worn contacts for almost two months… my eyes get so uncomfortable with contacts after four hours. I envy those who can wear contacts for 12 hours straight.

unnamed (2)

For the face makeup, I primed my skin with The Face Shop’s pore balm that I just realized I forgot to take a picture of, sorry! But you can read my review of it here =) I have been loving it so far even though it smells a bit medicated, it really does smooth out the appearance of your face. My concealer is also from The Face Shop and you can also read a review here.

To set my foundation, I used the Maybelline Mineral Powder which is probably one of my drugstore favourites of all time. I recently re-discovered this foundation and haven’t looked back! The first time I bought this, it came with a really horrible and stiff brush which looked really cakey and gross on your skin. When using my own regular brush, it’s a really good finishing powder and makes your face look smoother.

SONY DSC
Should have worn lipstick before taking this picture >.< Just ignore my lips!

Finishing off, I used my Lancome Blush Subtil set lightly over my cheeks. I find that this blush, or this shade in particular, gives you a very youthful, rosy, and cute look. It’s also very light, so it might be a bit hard to see here.

Wow, I just noticed how colour-less my lips look…ugh. We had just finished eating dinner and I didn’t think to reapply lipstick for this picture, whoops. Anyways, I’m wore the Chanel Rouge Coco lipstick line in 80 – Etole. It’s a nice, neutral shade. I like it because it looks suitable with many makeup looks.

unnamed
Bonus picture of the view =)

Anyways, my bunny Benji is going crazy, running and jumping around in circles so I should probably call it a post and play with him (You can probably see him over on the right, in my Instagram preview hehe). I had a fun time writing this post and I hope you enjoyed it as much as I enjoyed putting it on! Happy late Valentines to all my readers once again =)

Hope to talk soon!

-Carmen


Filed Under: eyes, face, lips, love, makeup Tagged: beauty, beauty blogger, blush, ELF, eotd, eyebrows, eyeliner, eyeshadow, fotd, foundation, kat von d, makeup, makeup blogger, makeup looks, makeup review, makeup tutorial, motd, naked palette, the face shop, urban decay, valentines day

  • 1
  • 2
  • Next Page »

Hello!

Hi and welcome to Curiously Carmen! I am Carmen, the girl behind the blog. You can read more about me here!

Recent Posts

  • H&P Noodle House Burnaby
  • Travel: Harry Potter Studio Tour (Watford, UK)
  • Travel: The Resident Soho Hotel, London UK
  • North Noodle House
  • Grand Crystal Seafood Restaurant

Subscribe to Blog via Email

Enter your email address to subscribe to this blog and receive notifications of new posts by email.

Partnerships

View my food journey on Zomato!

Archives

Theme Design By Studio Mommy · Copyright © 2025

Copyright © 2025 · Young Blush Theme on Genesis Framework · WordPress · Log in